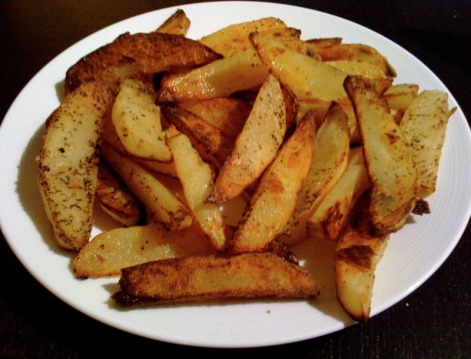
 I have been making baked fries at home for a very long time. They have always tasted good, but the consistency has never been perfect. I thought that this was simply because they were well, baked. I found out recently that I was totally wrong. Baked fries can actually be just as tasty as fried fries! This is a huge deal because french fries are, as you probably know, one of the best tasting things on earth.
After reading the recipe below, you may think that it sounds like a lot of work, and that's actually what I thought at first too. I am used to pretty much putting the fries in, flipping them once, and getting them out. This method definitely takes more steps, but it's actually very easy and 100% worth it. The fries are crispy on the outside and soft on the inside - just like real fries! I will never make baked fries the old way again. I have to give credit to Cooks Illustrated who came up with this ingenious way of baking the fries and thanks to one of my favorite bloggers, Annie's Eats, for sharing this recipe on her blog. Enjoy! Ingredients: - 3-4 russet potatoes, peeled and cut into wedges - 5 tbsp of vegetable oil - 3/4 tsp of kosher salt, plus more to taste - 1/3 tsp ground black pepper, plus more to taste Directions: Preheat the oven to 475 degrees. First, peel and cut the potatoes into even sized wedges. Soak the potato wedges in a large bowl with hot water for 10 to 30 minutes (I soaked them for as long as it took for the oven to heat up). Then, brush 4 tablespoons of oil on a heavy baking sheet. Sprinkle the salt and pepper evenly on the sheet and set aside. After the potatoes have been soaked, drain them and pat them dry with paper/kitchen towels. Place the potatoes back into the dried bowl and toss the them with the remaining tablespoon of oil. Then, place the potatoes on the baking sheet in a single layer. Cover the sheet tightly with aluminum foil and bake for five minutes. Once five minutes has passed, remove the tinfoil and continue baking for about 15-20 minutes, rotating the baking sheet after 10 minutes. Then, flip the wedges over and then bake for 5-15 minutes, rotating the sheet as many times as needed to cook the potatoes evenly. If needed, put the broiler on for a minute or two at the end to make sure they are extra crispy and browned. Place the fries on a paper towel and sprinkle with salt and pepper. Serve immediately.
22 Comments
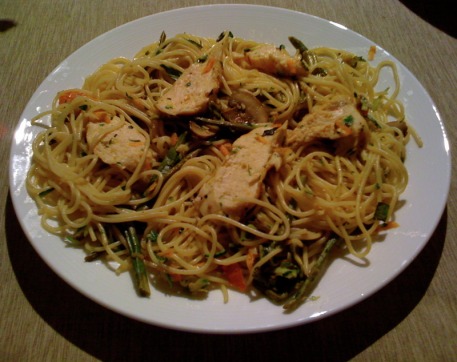 My husband and I went to a hole in the wall Italian restaurant a couple of weeks ago and as I was reading the menu, I came across Pasta Primavera. I was really tempted to order it, but my husband informed me that Pasta Primavera is , "gross and has lots of weird vegetables in it". I decided to listen to him because the place was a bit scummy, but since then I had wanted to try this pasta. I thought that pasta with lots of yummy vegetables actually sounded quite delicious and enticing!
When I got home I found a five star rated Ellie Krieger recipe that I used to guide me for this dish. I loved that I could basically put any vegetables in it that I wanted and take away any that I didn't want either. I also added grilled chicken since my husband isn't a fan of vegetarian dishes. The end result of this meal was delicious. The vegetables are yummy and fresh and the pasta sauce is perfectly flavored. I was afraid that the sauce may be a bit too dry, but it was light and creamy at the same time. Even my husband, who was less than thrilled that I decided to cook this, was impressed and said it was really good! This one is definitely a keeper. Oh and for all my veggie followers (all two of you!), this one is for you! :) Ingredients:
Directions: Cook pasta according to package directions and set aside. Reserve 1/2 cup of pasta water. Prepare all your veggies first. Mince the garlic, cut the asparagus, slice the mushrooms, and slice the carrots and zucchini. This will save you lots of time! Heat olive oil in a large pan over medium high heat. Cook the garlic until soft and fragrant. Add the mushrooms, tomatoes, and asparagus and cook until softened for about 5-10 minutes. Add the flour, stir and cook for oneminute. Then add the chicken broth, milk, salt, and pepper and stir some more. Bring the mixture to a boil and reduce to a simmer and cook for a few minutes until the liquid has thickened a little. Add the carrots, zucchini, parsley, and basil. Mix in the pasta with the vegetables and toss everything around well. Add pasta water to the pasta if necessary to loosen the mixture. Taste for seasonings and serve. Enjoy! 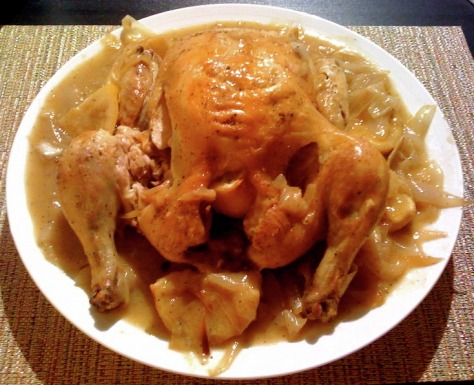 The rumor is that if you make this simple and full-proof roast chicken, your significant other will propose to you soon after. Hence the name, Engagement Roast Chicken! I have heard of the legend of this chicken before, but only decided to try it recently after my mom told me how tasty it is. I mean really, chicken, lemon, garlic, olive oil - it has to be good!
This meal was surprisingly delicious and very simple. Ina Garten's version (which of course is the version I made) rates it as "medium" difficulty, but I have to say that I found it quite easy to make. If you know how to chop vegetables and not overcook your poultry, you're good to go. Unfortunately, I can't comment if the legend is true and your significant other will propose soon after eating this dish, because I'm already married. I can say though that my husband loved it and I got a lot of praise! Enjoy! *Swankers, I did leave the skin on while cooking because I am substituting chicken cooked with skin for my read meat this week. However, I'm sure it would be just as delicious without the skin since the sauce is so flavorful. Ingredients:
Directions: Preheat the oven to 425 degrees. Remove the giblets from the chicken and discard. If necessary, pat the outside of the chicken dry. Sprinkle salt and pepper inside the cavity of the chicken. Put two lemon quarters inside, along with the two garlic halves. Brush the outside of the chicken with olive oil and sprinkle generously with salt and pepper. Tie the legs of the chicken together with kitchen string and tuck the wings under the chicken. In a large bowl, toss together the remaining lemon quarters, chopped onions, 1 tablespoon of olive oil, 1 teaspoon of salt, and 1/2 teaspoon of pepper. Place the chicken in a small roasting pan (11 x 14) and pour the onion and lemon mixture around the chicken. Bake the chicken for about 1 hour and 15 minutes, or until the juices run clear when you cut between the leg and the thigh. After the chicken has cooked, place the chicken on a platter and cover with tinfoil. While the chicken is resting, make the sauce. Place the roasting pan, with the onions and lemon left inside, on the stove on medium high heat and add the wine to the pan. Using a wooden spoon, scrape up all the brown bits. Then, add the chicken stock and stir some more. Finally, add 1 tablespoon of flour to the sauce and mix nonstop for one or two minutes until the sauce thickens. Add any chicken drippings from the platter and mix more. Finally, pour the sauce around the whole chicken and serve. You can also carve the chicken and pour the sauce over it. Yum! By the way, mashed potatoes and asparagus go great with this dish! 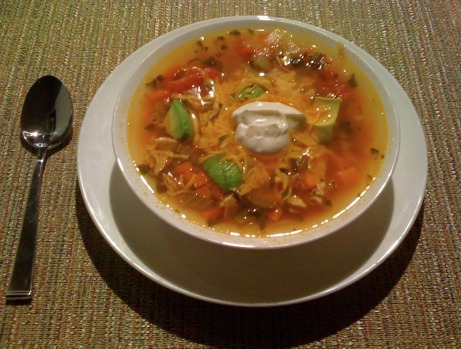 I'm back! Wow, I cannot believe I haven't updated my blog in over two months! For the last couple of months I have been eating the same ol' same ol'. Nothing new and exciting, and definitely nothing that was blog-worthy. I was just completely uninspired to make anything new that I came across.
That was until I went to my sister-in-law's house for dinner about a week ago. Lynn is an incredible cook and every time I go to her house I get to try a new delicious and diet-friendly meal. This time it was Ina Garten's Mexican Chicken Soup. I absolutely love Ina and had spotted this recipe before, but just hadn't gotten around to trying it. What a treat! The soup is light, a little spicy, and very healthy. It's delicious as an appetizer or as a meal and I think it's a good soup to eat year round since it's not heavy at all. I made the soup a little healthier by using skinless chicken breasts and also by choosing fat free toppings. I hope you enjoy this soup as much as I did! Ingredients for Soup:
Preheat the oven to 350 degrees. Remove the skin from the chicken breasts, brush the breasts with olive oil and sprinkle generously with salt and pepper on both sides. Bake the chicken for 35-40 minutes, or until the breasts are cooked through. Set chicken aside and let it cool. Meanwhile, prepare your vegetables. Chop the onions, carrots and celery. Mince the garlic and jalapenos. Finally, crush the tomatoes. To crush the tomatoes, pout the can into a bowl and smash the whole tomatoes with a fork. Then, heat three tablespoons of olive oil on medium heat in a large pot or dutch oven and cook the carrots, celery, and onions in the pot for 10 minutes, or until the vegetables are crisp tender and the onions are starting to brown. Add the garlic to the pot and cook for 30 more seconds. Next, add the tomatoes and their puree to the pot along with the chicken stock, jalapenos, cumin, coriander, 1 teaspoon of pepper, and the cilantro. Bring the soup to a boil and then lower the heat and simmer for 25 minutes. Once the chicken is cool enough to handle, shred it with your hands (or a fork and knife) and add it to the pot. Serve the soup with a little bit of sliced avocado, a dollop of yogurt and some cheddar cheese. Yum! 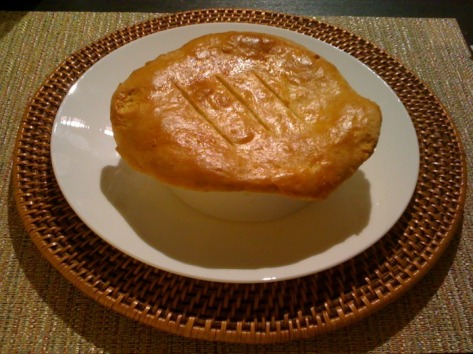 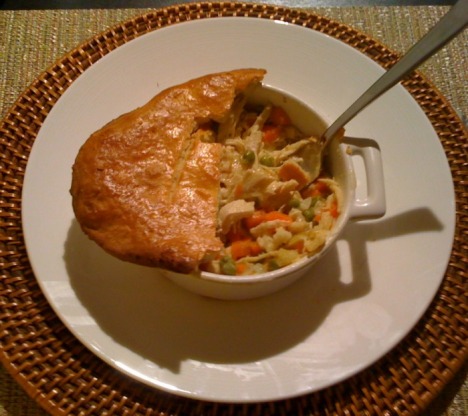 Chicken Pot Pie, take two! I made Chicken Pot Pie before and blogged it, and honestly thought it was an awesome "diet" substitute. That was before I discovered I could make a real and savory crust, not a phyllo crust. After deciding to remake the crust, I also decided to revamp the filling a bit as well. I thought the first filling was still very good, but had some room for improvement. The new and improved Chicken Pot Pie is really, really amazing. The inside is creamy and chunky and the outside is crusty and delicious. Absolute perfection! I also decided to make individual pot pies this time, which I find are much prettier and are the perfect serving size. This will definitely fulfill the craving for pot pie if you are on a low fat diet. Promise! Even my mother loved it, who is not on my diet :).
The recipe takes time to make (I would say at least 2 hours) but it's well worth the time and effort. I actually really enjoy taking time to make something complicated every once and a while. However, If you need to cut the time, you can prepare some ingredients the day before, which would significantly reduce the cooking time. For example, you can bake the chicken the day before and refrigerate it, and you can also use frozen vegetables as well. I do not recommend using a rotisserie chicken, since it is cooked with the skin, which adds a lot of fat. I also I do not recommend using a store-bought crust. The crusts are high in fat and have very unhealthy ingredients. Besides, the crust listed below is really quite easy to make. I hope you enjoy making and eating this recipe as much as I did! Ingredients for Filling:
Preheat the oven to 350 degrees. Place the boneless skinless chicken breasts on a baking sheet, brush them with extra virgin olive oil on both sides, and sprinkle generously with salt and pepper all over. Bake the chicken for 35-40 minutes, or until cooked through. Let the chicken cool enough so that it can be handled. Then, shred the chicken with your hands, or if you prefer, cut the chicken into cubes. (This step can be done a day in advance in order to save time). To make the filling, begin by preparing your vegetables. Chop your carrots, onions, and mince the garlic. Cook the peas in the microwave and set aside. Heat three tablespoons of olive oil on a medium heat. Cook the onions, carrots, garlic and thyme for 8-10 minutes or until the onions are translucent and carrots are crisp-tender. Add the chicken stock and season with salt and pepper to taste. Then, add the 1/4 cup of flour to the vegetables and cook for one minute, stirring continuously. Add the half and half and buttermilk slowly, stirring continuously until the mixture is smooth. Let the mixture simmer on low and thicken, stirring occasionally. Directions for Crust: While the filling is simmering, it's time to make the crust. In a large mixing bowl, mix together the flour, baking soda, baking powder and salt together with a wooden spoon. In a small mixing bowl, whisk together the buttermilk, vegetable oil and egg. Pour the milk mixture over the flour mixture. Stir the mixture together with a spoon until most of the ingredients are gathered together. Then, using your hands, make a ball out of the dough and grab any leftover pieces of dough and put it together. On a floured surface, knead the ball of dough 10-12 times. Then, using a floured rolling pin, roll the dough out to 1/8 to 1/4 inch thickness. Cut the dough into four 7.5 to 8 inch circles, one for each bowl. You can use the bowls as a guide if necessary. Now, fill each bowl with filling to the top and then carefully place a dough circle on top of each bowl. Press the dough securely around the bowls and brush them egg wash. Cut three slits into the top of each pot pie and place them on a baking sheet. Bake the pot pies in the oven for 25-30 minutes, or until the crust is golden brown. Let the pot pies cool for about 10-15 minutes and serve. Enjoy!! Mysteriously, Weebly deleted my Chicken Pot Pie recipe from my blog. Were they trying to tell me something? All that was left of the blog entry was the link to the printable recipe and the link to the inspiration recipe. That's okay though. I have been wanting to improve this recipe and make it with a proper crusty topping (not phyllo) for weeks now. Therefore, stay tuned for my next new and improved Chicken Pot Pie recipe that is coming this week. Mmmm I can't wait to eat it! I'm even going to purchase new soup bowls for the occasion. :)
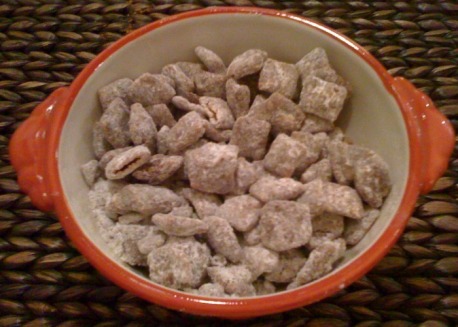 I'll give you one guess as to why this delicious dessert and snack is called Puppy Chow. Did you figure it out? It looks like dog food! I think even if I had a good camera (not my iphone) this dish would still look pretty ugly. But, I don't care what it looks like, its sooo darn good. I mean how can chocolate, peanut butter, and powdered sugar mixed with cereal be bad? This is so yummy, and so easy to make too.
The original recipe calls for melted chocolate, so this recipe uses a chocolate sauce as a substitute that is made from cocoa powder. You really do not notice the difference at all in the consistency of the dessert. Even though this dessert is low fat and Swank-friendly, it's definitely not healthy. There is tons of sugar in it, so be aware of that. But, we all have to indulge sometimes, right? I hope you enjoy this recipe as much as we do! Ingredients:
Using a large microwave safe bowl, whisk together the cocoa powder and canola oil. Whisk until smooth and the cocoa and oil are completely incorporated. Then, add 1/4 cup of the powdered sugar and 1 tablespoon of skim milk. Whisk until smooth. Continue adding the remaining powdered sugar and remaining milk the entire cup of powdered sugar and four tablespoons of skim milk are mixed in with the cocoa and canola oil. Next, add the creamy peanut butter to the mixture. Whisk more until the mixture is smooth again. Now, microwave the mixture for 30 seconds. Add the cereal to the chocolate mixture and stir together using a large spatula. Finally, transfer the cereal mixture to a sealable bag or container along with the remaining one and a half cups of powdered sugar. Shake the bag or container well several times. Make sure that powdered sugar is covering each piece of cereal. You don't want the cereal to clump together, so mix, mix, mix! After mixing, put the cereal in the freezer for 15 minutes and serve immediately. Store the remaining cereal in the refrigerator to enjoy later. :) Hello everyone!
I just wanted to let you know that from time to time I update or adapt a past recipe in order to make it better. I will be going back and changing these recipes and there will be a note on the top of the blog entry that says "updated on such and such date". I will also have this date updated on the printable version of the recipe. Sometimes these changes are minor, such as adding 1/4 cup of Greek yogurt to my potato soup recipe. This isn't a necessary change, but this is just something that I felt improved the creaminess and flavor of the soup. Other changes are actually mistakes made in measurements or ingredients. For example, I accidentally put "3 8 oz jars of tomato sauce" instead of "2 34 ounce jars of tomato sauce" for my tomato soup recipe. This was a typo that I somehow made and obviously makes a huge difference in the end result of recipe. I just wanted to give you a heads up to look out for the little "updated on" date to make sure the recipe you are referring to is the latest and greatest! Oh and as a New Years Blogging Resolution, I will be taking better pictures of my food! I have been using my iphone for far too long and it's about time I take some time in getting decent pictures of the delicious food featured on the blog. My camera is being sent to be fixed, I now own a tripod, and I will get some natural sunlight into our condo somehow! Be on the lookout for much better pictures of past and present dishes on the blog! Happy Eating! :) Well, I'm finally home from the hospital - hooray! No more nasty hospital food, IVs, meds, blood tests, MRIs, or uncomfortable beds! I'm getting better each day too, which is awesome. Drugs definitely work!
I am on bed rest until Monday though so I'm just taking it easy and sleeping a lot. I'm also watching Food Network all day which is making me want to cook up a storm! I can't wait until I have the go ahead to get back in the kitchen, it has been far too long. So, since I have all this free time on my hands, I figured it was a perfect time to take requests from readers. Is there any recipe that you would love to see featured on my blog? Perhaps something that isn't so healthy that you wish was so you could indulge in it? Whatever it is, if it's a main course, side dish, soup, appetizer, dessert, etc. just leave a comment here and let me know. I'll try my best to recreate or make the recipe and post is as soon as possible. Keep in mind some recipes take a few tries to get right, so I might not be posting your recipe for a little while. Can't wait to see the comments! :) 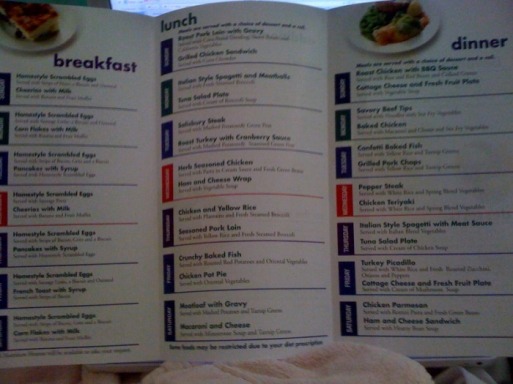 Okay, as some of you probably already know, I'm currently in the hospital getting a treatment of steroids for my MS. Staying in the hospital is never fun for anybody, but I would say one of the worst reasons is the horrible food. I simply don't understand why it's so nasty. Is it because they have to cook for so many people?I understand that recipes can't be complicated to feed the masses, but there are so many simple recipes that are healthy and delicious that I just don't understand why the chef doesn't research and take care of it! I mean if you glance up at the limited menu above, it's so unappetizing and so unhealthy. More unhealthy and unappealing that it sounds even because of the lack of salt and hidden fattening ingredients.
Italian Style Spaghetti and Meatballs? What other style is there? Seasoned Pork Loin? No thanks. Beef Tips? I'll pass on the heart attack. Ham and cheese? Really? Ham and cheese?! The worst part is, everything they consider "healthy" is all made with butter or margarine still and has zero salt or any other flavoring. Mmmm sign me up for a plate of green beans made in the microwave with no seasoning and some margarine please! Ugh. This is always one of the worst parts of being here for me. They can't accommodate my diet, and if they do it's so bland that it's inedible and I end up having to have people bring me real food so I don't starve. I'm hopefully going home tonight where I can have some delicious turkey chili to warm me to the core and make my tummy happy! Sorry for the ranting post, I just simply don't get it why it's so bad. I see a connection here with school cafeterias and hospital cafeterias. We really need an intervention to improve food in these places! Maybe Whole Foods can sign up? A girl can dream :) |  AuthorMy name is Michelle Bolooki and I was diagnosed with Multiple Sclerosis in June 2002. I have been on the Swank MS Diet since April of 2005. I have created this blog in order to share some delicious and healthy low fat recipes that I have come across the last few years. Enjoy! CategoriesAll |
 RSS Feed