 One of the first things I wanted to try when I went off the Swank diet was Fettucini Alfredo. Pre-diet days, that was my absolute favorite Italian dish and I always ordered it at restaurants. Post-diet days, it's still delicious, but the fat content is just too much for me to rationalize making at home on a regular basis. I'm still supposed to eat healthy, people! Plus, the five pounds or so that I have gained is enough for me. :)
Anyway, I came across this Ellie Krieger recipe, and decided to try it. I always love her food makeovers! This one is definitely one of my favorites and I'm so glad that I have a light alfredo dish to turn to when I'm craving a creamy pasta dish! I love the light sauce and the addition of the zucchini. I also add mushrooms because I just love them. You can pretty much add any veggie you like to this. My hubs isn't a fan of anything creamy, and even he loved this dish. When your picky eater husband approves a meal, you know that means the dish is a hit! Ingredients:
Directions: Cook pasta according to package directions. Reserve 1/2 cup of the pasta water and set the cooked pasta aside. Meanwhile, heat one tablespoon of olive oil in a large nonstick skillet/dutch oven. Add 1-2 cloves of garlic and saute over medium heat for 30 seconds, until fragrant. Add the zucchini and mushrooms and cook until tender, stirring occasionally, about 6-8 minutes. Transfer the veggies to a bowl. Heat another tablespoon of oil in the skillet. Season the chicken with salt and pepper on both sides. Cook the chicken in the pan, about 2-3 minutes per side depending on thickness. Set the chicken aside. In a small bowl, whisk the low fat milk and flour together. Add another tablespoon of oil to the skillet with the remaining garlic. Cook 30 seconds on medium heat, until the garlic is fragrant. Add the milk-flour mixture and bring it to a boil, stirring constantly. Reduce the heat to low and cook, continuing to stir, for about two minutes. Finally, add the evaporated milk, 1/2 teaspoon of salt, and the grated cheese. Stir to melt the mixture, for approximately one minute. Cut the chicken into strips and toss together the pasta, alfredo sauce, zucchini, mushrooms, and parsley. Add reserve pasta water to loosen if necessary. Taste for seasoning and serve immediately. Enjoy! *Omit the chicken and add more vegetables to make delicious vegetarian dish!
139 Comments
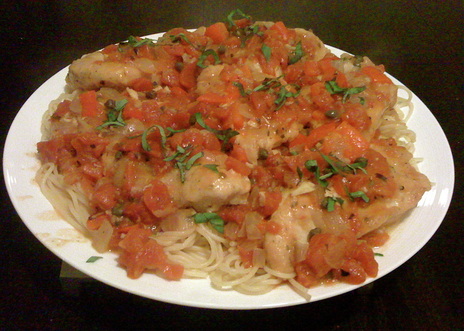 I have been wanting to try this recipe FOR.EV.ER (said in Squint's voice from The Sandlot). It's a Giada recipe, which almost never disappoints, and it has 575 reviews on Food Network with a 5 star rating. Seriously, this is a no brainer. However, my husband thinks Chicken Cacciatore is absolutely disgusting. He hates it at restaurants and has been scarred by previous bad experiences with this dish. Every time I mentioned it while I was meal planning, he would make it abundantly clear that he would not eat this meal if I made it. Finally, I decided to make it anyway and not tell him. Guess what??? I'm sure you know what comes next...HE LOVED IT. I actually made him repeat to me at least five times that he loved it and that he was wrong for discouraging me from making it before. I also made him swear never to question me and my cooking skills again. I won this battle! HA!
Try this recipe. It's a healthier version of Giada's and its delicious and easy. Ingredients:
Season the chicken with 1 teaspoon of salt and 1 teaspoon of pepper. Then, dredge the chicken lightly in flour. In a large saucepan or dutch oven, heat the olive oil over medium high heat. Add the chicken and cook until brown, about 5 minutes per side. Depending on the size of your pan, this could take a couple of batches. Set the chicken aside on a plate. Now add the bell pepper, onion and garlic to the pan. Add a little oil to the pan if necessary (since using skinless breasts, there may not be much grease to work with). Cook until the onions are soft and translucent, about 5 minutes. Season with a little salt and pepper. Add the wine to the pot and cook it until it reduces by half, about 3 to 5 minutes. Then add the tomatoes with their juice, chicken broth, and the oregano. Return the chicken to the pan and make sure to cover with the sauce. Bring the sauce to a simmer and cook the chicken for about 20-30 minutes. Once the chicken is cooked through, remove the chicken with tongs and place on a platter. Cook the sauce a little longer if necessary to thicken it. Pour the sauce over the chicken and sprinkle with basil. I served my chicken on a bed of spaghetti with some garlic bread on the side. This is a really delicious and easy weeknight meal. Enjoy! 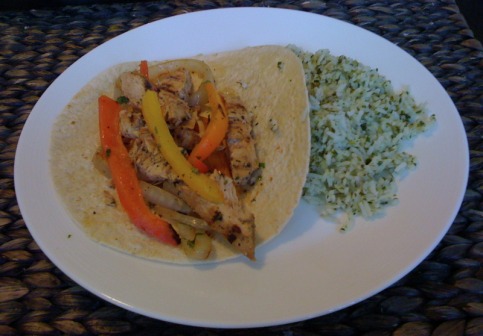 Mmmm chicken fajitas! I mean can you go wrong with this dish? This is just one of those recipes where you read the ingredients and your mouth waters. You know it can't possibly be bad with all the amazing elements involved. I hadn't had chicken fajitas in years and ooo this recipe did not disappoint! The marinade/sauce is delicious and the veggies are saucy and grilled to perfection. These are just amazing and healthy fajitas. This is a great summer (and year-round) recipe. Try it with some cilantro rice and even some guacamole - yum!
Ingredients:
In a bowl, whisk together the lime juice, oil, garlic, Worcestershire sauce, brown sugar, jalapeno, cilantro, salt, and pepper. Reserve 1/4 cup of the marinade and set aside for later use. Put the marinade and the chicken breasts in a zip lock bag and refrigerate for at least 20 minutes. Massage the marinade into the chicken at least once while marinating. While the chicken is marinating, heat up the grill. I used an indoor grill that worked perfectly. Place the chicken on the grill and cook about 2-3 minutes per side, or until cooked through (check to make sure it's no longer pink inside). Meanwhile, brush the onion rings and bell peppers with the remaining two tablespoons of oil. Place them on a cooler part of the grill, skin side down, and sprinkle with salt and pepper. Grill the vegetables for 8-10 minutes or until they are charred and crisp tender. Make sure to turn at least once while grilling. After the chicken is cooked, cut the breasts into thin strips and place in a bowl. Toss with two tablespoons of the reserved marinade. Once the veggies are cooked, slice and separate the onions into strips and place the onion slices and peppers into another bowl. Toss with the remaining two tablespoons of marinade. Grill the tortillas for about 20-30 seconds per side. Make sure not to overcook them, you want them to still be pliable. Serve the fajitas with some fat free yogurt/sour cream, guacamole, rice, and whatever else you like! Enjoy! 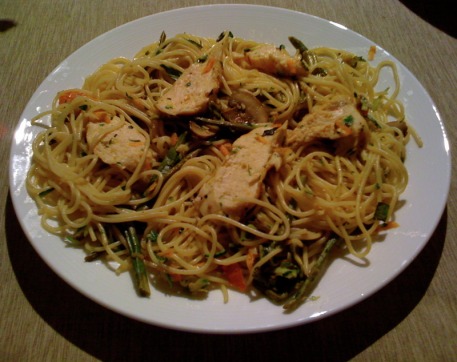 My husband and I went to a hole in the wall Italian restaurant a couple of weeks ago and as I was reading the menu, I came across Pasta Primavera. I was really tempted to order it, but my husband informed me that Pasta Primavera is , "gross and has lots of weird vegetables in it". I decided to listen to him because the place was a bit scummy, but since then I had wanted to try this pasta. I thought that pasta with lots of yummy vegetables actually sounded quite delicious and enticing!
When I got home I found a five star rated Ellie Krieger recipe that I used to guide me for this dish. I loved that I could basically put any vegetables in it that I wanted and take away any that I didn't want either. I also added grilled chicken since my husband isn't a fan of vegetarian dishes. The end result of this meal was delicious. The vegetables are yummy and fresh and the pasta sauce is perfectly flavored. I was afraid that the sauce may be a bit too dry, but it was light and creamy at the same time. Even my husband, who was less than thrilled that I decided to cook this, was impressed and said it was really good! This one is definitely a keeper. Oh and for all my veggie followers (all two of you!), this one is for you! :) Ingredients:
Directions: Cook pasta according to package directions and set aside. Reserve 1/2 cup of pasta water. Prepare all your veggies first. Mince the garlic, cut the asparagus, slice the mushrooms, and slice the carrots and zucchini. This will save you lots of time! Heat olive oil in a large pan over medium high heat. Cook the garlic until soft and fragrant. Add the mushrooms, tomatoes, and asparagus and cook until softened for about 5-10 minutes. Add the flour, stir and cook for oneminute. Then add the chicken broth, milk, salt, and pepper and stir some more. Bring the mixture to a boil and reduce to a simmer and cook for a few minutes until the liquid has thickened a little. Add the carrots, zucchini, parsley, and basil. Mix in the pasta with the vegetables and toss everything around well. Add pasta water to the pasta if necessary to loosen the mixture. Taste for seasonings and serve. Enjoy! 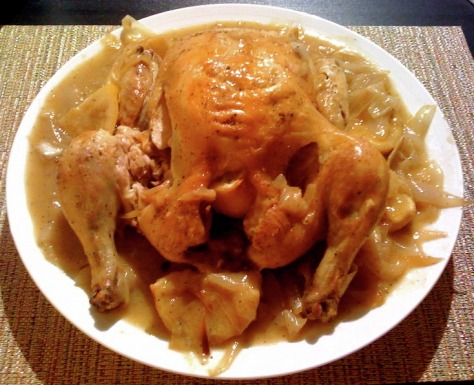 The rumor is that if you make this simple and full-proof roast chicken, your significant other will propose to you soon after. Hence the name, Engagement Roast Chicken! I have heard of the legend of this chicken before, but only decided to try it recently after my mom told me how tasty it is. I mean really, chicken, lemon, garlic, olive oil - it has to be good!
This meal was surprisingly delicious and very simple. Ina Garten's version (which of course is the version I made) rates it as "medium" difficulty, but I have to say that I found it quite easy to make. If you know how to chop vegetables and not overcook your poultry, you're good to go. Unfortunately, I can't comment if the legend is true and your significant other will propose soon after eating this dish, because I'm already married. I can say though that my husband loved it and I got a lot of praise! Enjoy! *Swankers, I did leave the skin on while cooking because I am substituting chicken cooked with skin for my read meat this week. However, I'm sure it would be just as delicious without the skin since the sauce is so flavorful. Ingredients:
Directions: Preheat the oven to 425 degrees. Remove the giblets from the chicken and discard. If necessary, pat the outside of the chicken dry. Sprinkle salt and pepper inside the cavity of the chicken. Put two lemon quarters inside, along with the two garlic halves. Brush the outside of the chicken with olive oil and sprinkle generously with salt and pepper. Tie the legs of the chicken together with kitchen string and tuck the wings under the chicken. In a large bowl, toss together the remaining lemon quarters, chopped onions, 1 tablespoon of olive oil, 1 teaspoon of salt, and 1/2 teaspoon of pepper. Place the chicken in a small roasting pan (11 x 14) and pour the onion and lemon mixture around the chicken. Bake the chicken for about 1 hour and 15 minutes, or until the juices run clear when you cut between the leg and the thigh. After the chicken has cooked, place the chicken on a platter and cover with tinfoil. While the chicken is resting, make the sauce. Place the roasting pan, with the onions and lemon left inside, on the stove on medium high heat and add the wine to the pan. Using a wooden spoon, scrape up all the brown bits. Then, add the chicken stock and stir some more. Finally, add 1 tablespoon of flour to the sauce and mix nonstop for one or two minutes until the sauce thickens. Add any chicken drippings from the platter and mix more. Finally, pour the sauce around the whole chicken and serve. You can also carve the chicken and pour the sauce over it. Yum! By the way, mashed potatoes and asparagus go great with this dish! 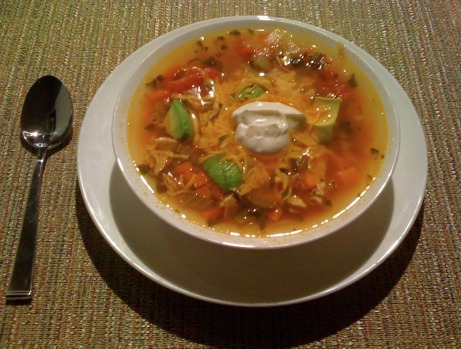 I'm back! Wow, I cannot believe I haven't updated my blog in over two months! For the last couple of months I have been eating the same ol' same ol'. Nothing new and exciting, and definitely nothing that was blog-worthy. I was just completely uninspired to make anything new that I came across.
That was until I went to my sister-in-law's house for dinner about a week ago. Lynn is an incredible cook and every time I go to her house I get to try a new delicious and diet-friendly meal. This time it was Ina Garten's Mexican Chicken Soup. I absolutely love Ina and had spotted this recipe before, but just hadn't gotten around to trying it. What a treat! The soup is light, a little spicy, and very healthy. It's delicious as an appetizer or as a meal and I think it's a good soup to eat year round since it's not heavy at all. I made the soup a little healthier by using skinless chicken breasts and also by choosing fat free toppings. I hope you enjoy this soup as much as I did! Ingredients for Soup:
Preheat the oven to 350 degrees. Remove the skin from the chicken breasts, brush the breasts with olive oil and sprinkle generously with salt and pepper on both sides. Bake the chicken for 35-40 minutes, or until the breasts are cooked through. Set chicken aside and let it cool. Meanwhile, prepare your vegetables. Chop the onions, carrots and celery. Mince the garlic and jalapenos. Finally, crush the tomatoes. To crush the tomatoes, pout the can into a bowl and smash the whole tomatoes with a fork. Then, heat three tablespoons of olive oil on medium heat in a large pot or dutch oven and cook the carrots, celery, and onions in the pot for 10 minutes, or until the vegetables are crisp tender and the onions are starting to brown. Add the garlic to the pot and cook for 30 more seconds. Next, add the tomatoes and their puree to the pot along with the chicken stock, jalapenos, cumin, coriander, 1 teaspoon of pepper, and the cilantro. Bring the soup to a boil and then lower the heat and simmer for 25 minutes. Once the chicken is cool enough to handle, shred it with your hands (or a fork and knife) and add it to the pot. Serve the soup with a little bit of sliced avocado, a dollop of yogurt and some cheddar cheese. Yum!  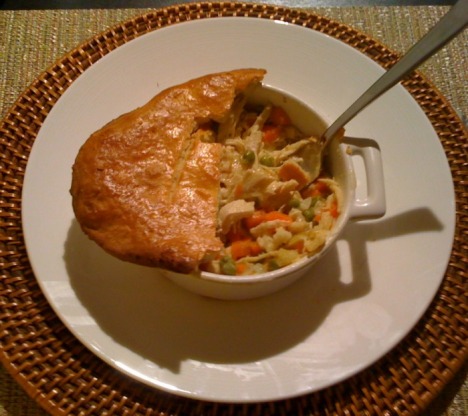 Chicken Pot Pie, take two! I made Chicken Pot Pie before and blogged it, and honestly thought it was an awesome "diet" substitute. That was before I discovered I could make a real and savory crust, not a phyllo crust. After deciding to remake the crust, I also decided to revamp the filling a bit as well. I thought the first filling was still very good, but had some room for improvement. The new and improved Chicken Pot Pie is really, really amazing. The inside is creamy and chunky and the outside is crusty and delicious. Absolute perfection! I also decided to make individual pot pies this time, which I find are much prettier and are the perfect serving size. This will definitely fulfill the craving for pot pie if you are on a low fat diet. Promise! Even my mother loved it, who is not on my diet :).
The recipe takes time to make (I would say at least 2 hours) but it's well worth the time and effort. I actually really enjoy taking time to make something complicated every once and a while. However, If you need to cut the time, you can prepare some ingredients the day before, which would significantly reduce the cooking time. For example, you can bake the chicken the day before and refrigerate it, and you can also use frozen vegetables as well. I do not recommend using a rotisserie chicken, since it is cooked with the skin, which adds a lot of fat. I also I do not recommend using a store-bought crust. The crusts are high in fat and have very unhealthy ingredients. Besides, the crust listed below is really quite easy to make. I hope you enjoy making and eating this recipe as much as I did! Ingredients for Filling:
Preheat the oven to 350 degrees. Place the boneless skinless chicken breasts on a baking sheet, brush them with extra virgin olive oil on both sides, and sprinkle generously with salt and pepper all over. Bake the chicken for 35-40 minutes, or until cooked through. Let the chicken cool enough so that it can be handled. Then, shred the chicken with your hands, or if you prefer, cut the chicken into cubes. (This step can be done a day in advance in order to save time). To make the filling, begin by preparing your vegetables. Chop your carrots, onions, and mince the garlic. Cook the peas in the microwave and set aside. Heat three tablespoons of olive oil on a medium heat. Cook the onions, carrots, garlic and thyme for 8-10 minutes or until the onions are translucent and carrots are crisp-tender. Add the chicken stock and season with salt and pepper to taste. Then, add the 1/4 cup of flour to the vegetables and cook for one minute, stirring continuously. Add the half and half and buttermilk slowly, stirring continuously until the mixture is smooth. Let the mixture simmer on low and thicken, stirring occasionally. Directions for Crust: While the filling is simmering, it's time to make the crust. In a large mixing bowl, mix together the flour, baking soda, baking powder and salt together with a wooden spoon. In a small mixing bowl, whisk together the buttermilk, vegetable oil and egg. Pour the milk mixture over the flour mixture. Stir the mixture together with a spoon until most of the ingredients are gathered together. Then, using your hands, make a ball out of the dough and grab any leftover pieces of dough and put it together. On a floured surface, knead the ball of dough 10-12 times. Then, using a floured rolling pin, roll the dough out to 1/8 to 1/4 inch thickness. Cut the dough into four 7.5 to 8 inch circles, one for each bowl. You can use the bowls as a guide if necessary. Now, fill each bowl with filling to the top and then carefully place a dough circle on top of each bowl. Press the dough securely around the bowls and brush them egg wash. Cut three slits into the top of each pot pie and place them on a baking sheet. Bake the pot pies in the oven for 25-30 minutes, or until the crust is golden brown. Let the pot pies cool for about 10-15 minutes and serve. Enjoy!! 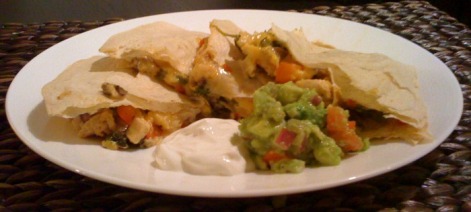 My new found love, Lifetime Cheese, makes the most delicious fat free cheeses I have ever tasted. Usually fat free cheeses taste rubbery and melt terribly. Lifetime Cheese actually tastes great and melts perfectly! I love the variety they offer as well (not just the typical mozzarella and cheddar). When I saw that they make a "Mild Mexican" flavor, I knew I had to finally make chicken quesadillas. Once I started sauteing the colorful vegetables I knew that this recipe would be amazing and healthy. Mmmm I wish I had leftovers to enjoy again tomorrow!
You can find this cheese at most grocery stores, but if you don't find it there you can also buy it from their website (link above)! Ingredients:
Preheat the oven to 350 degrees. Butterfly the chicken and put the thin breasts into a zip-loc bag with the vegetable oil, lime juice, garlic, and red pepper flakes. Massage the mixture around the chicken and let it marinade for at least an hour in the fridge. While the chicken is marinating, chop the red pepper, green pepper, onion, and mushrooms and set aside. Grate the cheese and set aside as well. *If making guacamole, you will also have time to prepare it during this time.* After the chicken has marinated, remove it from the fridge and cut the breasts into small cubes. Heat 1 tablespoon of olive oil in a medium large pan and add the chicken cubes. Sprinkle some fajita seasoning on your chicken, as much as you like Saute the chicken until they are cooked through. Remove the chicken from the pan and set aside. Add the remaining tablespoon of olive oil to the pan along with the peppers, onions, and mushrooms. Saute for a few minutes until the onion are soft and translucent. Add the cooked chicken back to the pan along with the spinach and saute for about one minute, until the spinach has wilted. Place two tortillas on a baking sheet. Scoop the chicken and vegetable mixture onto each tortilla and sprinkle some cheese over the top of each one. Then top with another tortilla. Bake the quesadillas in the oven for about 15-20 minutes, or until the cheese has melted and the tortillas are slightly toasted. Cut the tortillas into fourths and serve immediately with some plain yogurt, guacamole, and any other of your favorite dipping sauces! 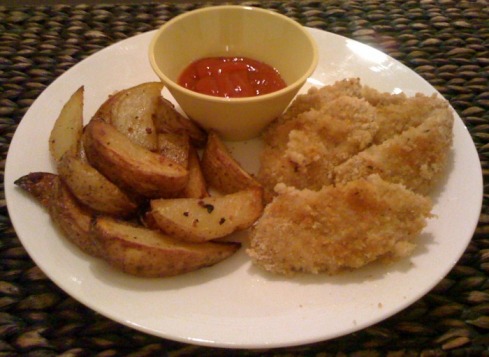 Oh yes, I said parmesan! This is not the parmesan you are expecting, but it's just as delicious! I decided to try some vegan/soy parmesan topping and I was not disappointed! What makes grated parmesan taste good? Parmesan flavor? Check! Parmesan consistency? Check! Fat content? Not so much. I am so happy to have found this and will be using it in a lot of my recipes from now on. Next on the diet hunt, blocks of fat free parmesan cheese. :)
This recipe is basically the same as my previous blog entry of Baked Italian Chicken Tenders, just with the parmesan added and different fries. This is a quick and easy meal for a weeknight. Yum! Ingredients for Chicken Tenders:
Directions for Chicken Tenders: Preheat the oven to 400 degrees. First, cut the chicken breasts up into chicken tenders. Then, put the chicken tender pieces in a large bowl and pour the buttermilk over them. Toss the chicken tenders in the buttermilk and make sure they are completely coated. Cover the bowl and put them in the refrigerator for at least 30 minutes. Combine the bread crumbs and parmesan topping in a bowl with a fork or whisk. Once the chicken is done marinating, take the chicken pieces directly from the buttermilk and coat each tender it in the breading. Make sure to pat the breading so that it sticks to the chicken pieces all over. Put the chicken tenders on a baking sheet and drizzle with a little olive oil. Bake the chicken tenders for 12-15 minutes, turning once, or until browned and cooked through. Serve immediately with your favorite dipping sauce. Directions for Potato Wedges: While the chicken is marinating, cut the potatoes into wedges. First, cut the potatoes lengthwise and then cut each half in thirds lengthwise. You'll have 6 wedges if you use a large potato. Put the potatoes on a cookie sheet and cover the potatoes with the olive oil, salt and pepper. With washed hands, toss the potatoes inside the oil, salt and pepper to make sure each potato is well coated. Spread the potatoes on the sheet in a single layer so one side of each potato is down. Bake the potatoes for 30 to 35 minutes, turning the potatoes once after about 20 minutes. Bake until the potatoes are browned and crispy on the outside, but not burned. Sprinkle with a little more salt and serve immediately. Yum! Tip: Put the potatoes in the oven first, on the bottom rack, so that the fries and chicken tenders are done at the same time. 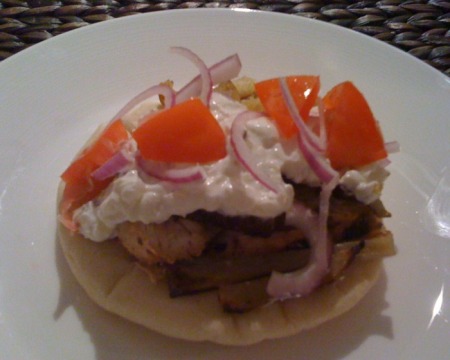 *Warning! This picture does not do the gyro justice. I obviously liked the yogurt sauce a bit too much and smothered my gyro with it. I also overpacked my gyro so much that I couldn't even fold it in half. Woops!* Okay, just a little over two months ago my husband and I were eating authentic chicken gyros in Greece almost everyday for 10 days. Needless to say, I was wary of how good these were going to be in comparison to the mouthwatering Greek gyros. Well, they were absolutely amazing!! They are so close to the original that we were shocked and ate up every bite within a couple of minutes (we didn't even talk!). I actually liked that this recipe is healthier than the authentic ones but you don't miss the fattening ingredients (full fat yogurt, chicken cooked with skin, dark meat, etc.). The original recipe suggests not to use nonfat yogurt, but I promise the consistency and taste was just as good with the brand of yogurt we used. Try this recipe, you will not be disappointed! Thanks to two of my favorite bloggers, Annie Eats and Elly Says Opa for sharing the recipe! (links to their blogs above) Ingredients for Tzatziki Sauce:
To make the tzatziki sauce, strain the yogurt using cheesecloth over a bowl. Let strain for several hours or overnight (I did it for about 24 hours), to remove as much moisture as possible. Shred the cucumber (I used a cheese grater). Wrap in a towel and squeeze to remove as much water as possible. Mix together the strained yogurt, shredded cucumber, garlic, white wine vinegar, salt and pepper to taste, and lemon juice. Drizzle lightly with olive oil. Refrigerate for at least 30 minutes to allow flavors to meld. To prepare the chicken, combine the garlic, lemon juice, red wine vinegar, olive oil, yogurt, oregano, and salt and pepper to taste in a ziploc bag. Swoosh the bag around a bit to make sure that everything is mixed well. Add the chicken pieces to the bag and massage the marinade all over the so that each piece is well coated. Cover and refrigerate for at least 1 hour. Cook the chicken as desired, either in the skillet or in a broiler. I cooked the chicken on the griddle to get some grill marks and then finished cooking it in the oven. Once the chicken is complete, let it rest for a few minutes, and then cut it into strips. Heat the pitas in the toaster or oven, with a little olive oil on top if desired. Serve immediately and get ready for your mouth to water!! Enjoy :) |  AuthorMy name is Michelle Bolooki and I was diagnosed with Multiple Sclerosis in June 2002. I have been on the Swank MS Diet since April of 2005. I have created this blog in order to share some delicious and healthy low fat recipes that I have come across the last few years. Enjoy! CategoriesAll |
 RSS Feed