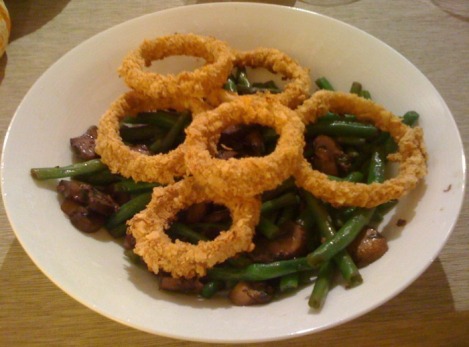
 This was by far the best side we had at our Thanksgiving. The BEST. I wanted to incorporate green beans into our meal, but I'm not really a fan of the traditional soup based green bean casserole and unhealthy pre-made onion topping. I looked a little and found that Michael Chiarello has a new take on green bean casserole. After reading the ingredients online and watching a short clip on Food Network's website, I was sold. The meal did not disappoint and I cannot wait to make it for friends and family for Christmas! The caramelized mushrooms were perfect and the sauce was delicious.
I didn't want to add unnecessary fat by putting deep fried onion rings on top, so I referred to another favorite chef, Ellie Krieger. She has a wonderful baked onion ring recipe that went perfectly with this casserole! On a side note, I made a another find while making this recipe. The Kettle Brand has a line of baked chips that are so scrumptious. I will never buy baked Lays again! Ingredients for Green Bean "Casserole":
Bring a couple of quarts of salted water to boil. Boil the green beans for 4 minutes, drain well, and then transfer them to a pan or plate to cool. Heat the olive oil in a large skillet over medium heat. Add the mushrooms to the pan and cook until brown for about 4-5 minutes. Don't stir the mushrooms so that they can properly caramelize. After the mushrooms have cooked, add the minced garlic and the thyme. Season with sale and pepper and cook until the garlic is fragrant, about 3-5 minutes. Remove the pan from the heat and add the cognac. Return the pan to the heat and add the wine and chicken broth. Stir to combine and simmer until the sauce thickens, about 8-10 minutes. Finally, add the green beans to the mushroom sauce and then toss everything together. Taste the mixture and add salt and pepper to taste if necessary. Top with baked onion rings (recipe below). Serve immediately, or at room temperature. Baked Onion Ring Ingredients:
Directions: Preheat the oven to 450 degrees. Peel the onion and cut it into rings. After that, put the entire bag of Kettle Chips into the food processor and pulse them until they are fine crumbs. Then, put the onion rings into a zip-loc bag with 1/2 cup of flour. Shake the bag so that the onions are completely coated with the flour. Now, create an assembly line for your onion rings. In the first bowl, combine the buttermilk, 2 tablespoons of flour and pepper. In the second bowl, put the crumbs from the chips. Finally, dip each of the floured onion rings into the buttermilk mixture and then into the crumb mixture. Make sure to pat the crumb mixture on the onion rings so they stick. Place each onion ring on a baking sheet sprayed with olive oil cooking spray. Let the onions sit on the sheet for a few minutes before you put them into the oven. Spray the onion rings with more olive oil cooking spray and then bake for 20 minutes or until they are golden brown and crispy. Sprinkle more salt on top if necessary and place the onion rings on top of the casserole. These onion rings are also excellent as a side with many other dishes!
41 Comments
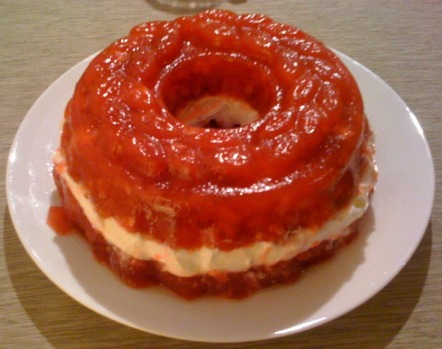 This jello has been a staple for the holidays for the last few years, and even though we only had a Thanksgiving for two, I had to make it for the first time! It is that sweet, cold, crunchy textured dish that you need to even out the rest of the sides you are eating on Thanksgiving. This is a favorite in our household and most often referred to as "refreshing" :) (that's an inside joke for my family). Try this recipe, it's easy and delicious! Thanks to my sister-in-law, Lynn, to introducing it to us!
Ingredients:
Directions: Begin by preparing your ingredients. Strain the pineapple and make sure to remove all the liquid, chop the walnuts and slice the strawberries. Then, make the jello according to the package directions. Make sure to use 1/2 cup less water than listed on the package. You will already have some extra liquid from the strawberries and the juice that is inside the pineapple. Add the strawberries, walnut, and pineapple to the jello mixture. Spray your jello mold with canola spray. Pour the mixture into the sprayed mold , filling it halfway. Refrigerate the mold for at least 4 hours, so the mixture has time to harden. Then, add the 3/4 cup of non-fat yogurt in an even layer on top of the jello inside the mold. Finally, add more jello mixture to fill the mold. Cover the mold with some saran wrap and refrigerate overnight. *If you have any extra jello mixture, put it in another container to refrigerate and enjoy later.* Leave the mold in the refrigerator until you are ready to serve. Once ready, put the mold in a small mixing bowl filed with warm water. Use a knife to slide around the mixture inside mold and then flip the mold out onto a plate carefully. Serve immediately and enjoy! Refrigerate any leftovers immediately before the mold melts and turns into a slop :). Click to set custom HTML
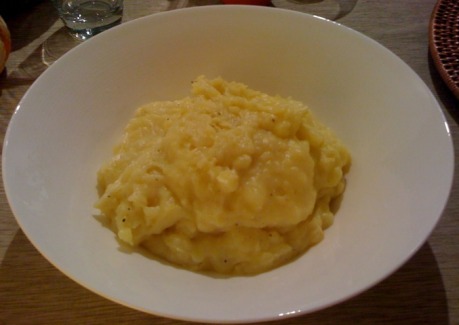 I love my usual garlic mashed potatoes, but sometimes you need something that isn't garlicy (I know that isn't a word) in order to go perfectly with your meal. Thanksgiving is a perfect example of when you need that non-garlic creaminess! Creaminess and low fat usually doesn't go together, but these mashed potatoes are great! Not surprisingly, they have one of my favorite ingredients in them. Greek yogurt. :)
Ingredients:
Once the potatoes are cooked, strain them and return them to the pot that they were cooked in. Then, heat the milk, buttermilk, and yogurt in a small saucepan on medium low heat. Stir the mixture to combine and do not let the milk boil. After the milk mixture has heated, add the milk to the potatoes. Using an immersion blender (or your favorite mashed potato making tool) mix the milk mixture and potatoes together until they are whipped and smooth. Add salt and pepper to taste. 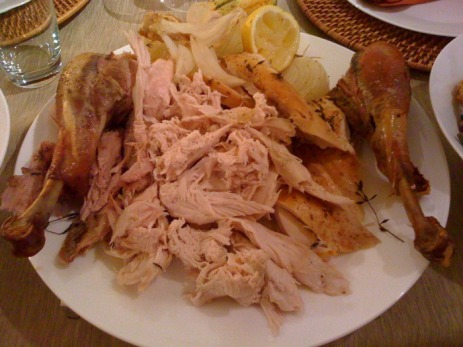 *Once again, this picture does not do the meal justice! I didn't have time to take a picture of the turkey whole and this was right before we were digging in.* My mom makes the best turkey, hands down. Everyone that has tried it always agrees! The turkey is never dry and always falls off the bone because it's so moist and delicious. The best part is, it's incredibly easy to make and doesn't require you to wake up at the crack of dawn to get it done on time. I use this same exact recipe to roast chickens as well, so you can enjoy this recipe year-round if you like! Ingredients:
The night before you want to cook the turkey, take out the neck and giblets, and pour about half the bottle of the mojo marinade on the outside of the turkey and inside the cavity. Cover the turkey with tin foil and put it in a roasting pan in the refrigerator until you are ready to cook it the next day. The next day, begin by preheating the oven to 325 degrees. After that, brush the entire outside of the turkey with olive oil. Put salt and pepper all over the outside of the turkey and also inside the cavity. Then, put a pierced lemon inside the cavity, along with the head of garlic, about 3/4 of the bunch of thyme, and half of the yellow onion. Also, put onion in the neck, and if it fits, some more garlic. Finally, put a few sprigs of thyme under each arm of the turkey and some minced thyme and minced garlic sprinkled all over the outside of the turkey as well. Pour more mojo marinade over the turkey and inside the cavity, cover the turkey loosely with tinfoil and put it in the oven to bake. Use the table on the outside of the turkey bag in order to have an idea of how long the turkey will take to cook based on its weight. I personally do not use a thermometer or any other tool to check if the turkey is done. Instead, I just check it every hour (at which time I baste it with some drippings or more mojo). Once the legs are starting to fall out of the sockets and the juices are pretty much running clear, I uncover the turkey and cook it for about 20-30 more minutes so the outside can brown. Check to make sure the turkey is cooked through (it should be since the legs were already falling out of the sockets before), cut it up, and serve it. That's it! It's extremely easy and so delicious. I have never had a dry turkey or chicken with this recipe and its very flavorful. Enjoy!  Mmmmm biscuits! I looove biscuits. Before I was on the diet, KFC was my guilty pleasure and their biscuits and gravy were the best! I hadn't eaten biscuits in over five years and I thought it was about time I made up my own recipe to stifle the craving. After a couple of tries, I have finally perfected it! I personally can't have butter with my biscuits, so I just eat them with eggs and a veggie sausage patty (which is mouth watering good!). They are also amazing with some light maple syrup. :)
The best part of this recipe is that you can double it and freeze the extra biscuits to eat later on. That's what I have been doing lately and it's great to be able to have some warm and fresh biscuits every morning with breakfast! Another awesome part of this recipe is how easy it is. You may think that it sounds complicated, but you do not even need a mixer to make it (only a bowl, a big spoon, and your hands!) and the 20 minutes prep time spent is definitely worth it, especially if you double the recipe and freeze the rest to enjoy for a couple of weeks. Ingredients for Biscuits:
Preheat the oven to 450 degrees. In a large mixing bowl combine the flour, baking powder, baking soda, and salt. Stir well with a wooden spoon. In a separate bowl beat together the buttermilk, vegetable oil and egg. Pour the egg mixture over the flour mixture and stir to combine with a wooden spoon. Using your hands, make the dough into a large ball (make sure to grab all the loose pieces that didn't combine with the spoon). On a lightly floured surface, knead the dough gently for 12-14 strokes. Then, using a lightly floured rolling pin, roll the dough out so that it's about 3/4 of an inch thick. Cut the dough with a 31/2 inch cookie cutter or biscuit cutter (or whatever you have that is closest to that size). Roll up the leftover dough into a new ball and then using the pin, roll out the dough again in order to make more biscuits (you don't want to waste any dough!). Make the egg wash by whisking together the egg white and milk. Put the biscuits on an un-greased baking sheet, brush lightly with the egg wash and bake for 12-15 minutes or until the biscuits are golden brown. This recipe yields about 10-12 biscuits. *If you are freezing the extra biscuits, roll out the dough, cut them, and put them into airtight baggies. Do not bake them! When you are ready to eat them, take out the frozen biscuits, let them thaw for a minute or so, put them on the cookie sheet and bake as usual. Note: they make take longer to bake since they are frozen.* Tip - freeze the extra biscuits in individual portions. For example, I put two biscuits in each baggy since we only eat two every morning. n Enjoy this delicious and easy recipe and please leave a comment if you make them! |  AuthorMy name is Michelle Bolooki and I was diagnosed with Multiple Sclerosis in June 2002. I have been on the Swank MS Diet since April of 2005. I have created this blog in order to share some delicious and healthy low fat recipes that I have come across the last few years. Enjoy! CategoriesAll |
 RSS Feed