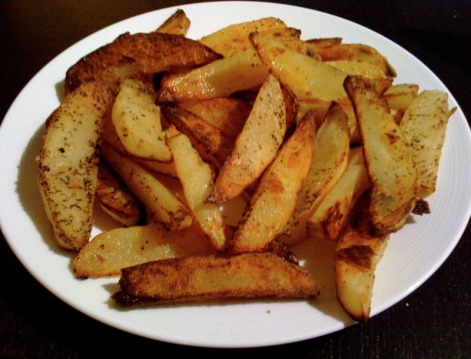
 I have been making baked fries at home for a very long time. They have always tasted good, but the consistency has never been perfect. I thought that this was simply because they were well, baked. I found out recently that I was totally wrong. Baked fries can actually be just as tasty as fried fries! This is a huge deal because french fries are, as you probably know, one of the best tasting things on earth.
After reading the recipe below, you may think that it sounds like a lot of work, and that's actually what I thought at first too. I am used to pretty much putting the fries in, flipping them once, and getting them out. This method definitely takes more steps, but it's actually very easy and 100% worth it. The fries are crispy on the outside and soft on the inside - just like real fries! I will never make baked fries the old way again. I have to give credit to Cooks Illustrated who came up with this ingenious way of baking the fries and thanks to one of my favorite bloggers, Annie's Eats, for sharing this recipe on her blog. Enjoy! Ingredients: - 3-4 russet potatoes, peeled and cut into wedges - 5 tbsp of vegetable oil - 3/4 tsp of kosher salt, plus more to taste - 1/3 tsp ground black pepper, plus more to taste Directions: Preheat the oven to 475 degrees. First, peel and cut the potatoes into even sized wedges. Soak the potato wedges in a large bowl with hot water for 10 to 30 minutes (I soaked them for as long as it took for the oven to heat up). Then, brush 4 tablespoons of oil on a heavy baking sheet. Sprinkle the salt and pepper evenly on the sheet and set aside. After the potatoes have been soaked, drain them and pat them dry with paper/kitchen towels. Place the potatoes back into the dried bowl and toss the them with the remaining tablespoon of oil. Then, place the potatoes on the baking sheet in a single layer. Cover the sheet tightly with aluminum foil and bake for five minutes. Once five minutes has passed, remove the tinfoil and continue baking for about 15-20 minutes, rotating the baking sheet after 10 minutes. Then, flip the wedges over and then bake for 5-15 minutes, rotating the sheet as many times as needed to cook the potatoes evenly. If needed, put the broiler on for a minute or two at the end to make sure they are extra crispy and browned. Place the fries on a paper towel and sprinkle with salt and pepper. Serve immediately.
22 Comments
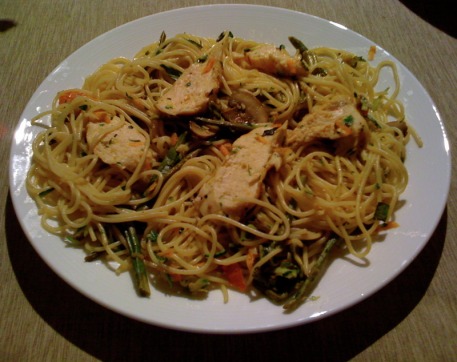 My husband and I went to a hole in the wall Italian restaurant a couple of weeks ago and as I was reading the menu, I came across Pasta Primavera. I was really tempted to order it, but my husband informed me that Pasta Primavera is , "gross and has lots of weird vegetables in it". I decided to listen to him because the place was a bit scummy, but since then I had wanted to try this pasta. I thought that pasta with lots of yummy vegetables actually sounded quite delicious and enticing!
When I got home I found a five star rated Ellie Krieger recipe that I used to guide me for this dish. I loved that I could basically put any vegetables in it that I wanted and take away any that I didn't want either. I also added grilled chicken since my husband isn't a fan of vegetarian dishes. The end result of this meal was delicious. The vegetables are yummy and fresh and the pasta sauce is perfectly flavored. I was afraid that the sauce may be a bit too dry, but it was light and creamy at the same time. Even my husband, who was less than thrilled that I decided to cook this, was impressed and said it was really good! This one is definitely a keeper. Oh and for all my veggie followers (all two of you!), this one is for you! :) Ingredients:
Directions: Cook pasta according to package directions and set aside. Reserve 1/2 cup of pasta water. Prepare all your veggies first. Mince the garlic, cut the asparagus, slice the mushrooms, and slice the carrots and zucchini. This will save you lots of time! Heat olive oil in a large pan over medium high heat. Cook the garlic until soft and fragrant. Add the mushrooms, tomatoes, and asparagus and cook until softened for about 5-10 minutes. Add the flour, stir and cook for oneminute. Then add the chicken broth, milk, salt, and pepper and stir some more. Bring the mixture to a boil and reduce to a simmer and cook for a few minutes until the liquid has thickened a little. Add the carrots, zucchini, parsley, and basil. Mix in the pasta with the vegetables and toss everything around well. Add pasta water to the pasta if necessary to loosen the mixture. Taste for seasonings and serve. Enjoy! 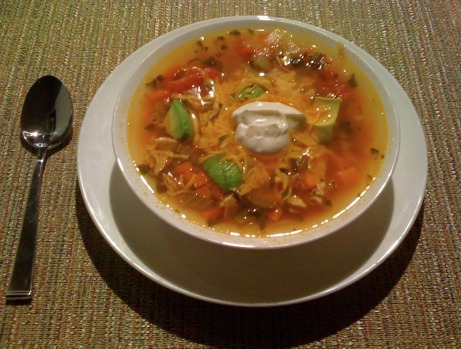 I'm back! Wow, I cannot believe I haven't updated my blog in over two months! For the last couple of months I have been eating the same ol' same ol'. Nothing new and exciting, and definitely nothing that was blog-worthy. I was just completely uninspired to make anything new that I came across.
That was until I went to my sister-in-law's house for dinner about a week ago. Lynn is an incredible cook and every time I go to her house I get to try a new delicious and diet-friendly meal. This time it was Ina Garten's Mexican Chicken Soup. I absolutely love Ina and had spotted this recipe before, but just hadn't gotten around to trying it. What a treat! The soup is light, a little spicy, and very healthy. It's delicious as an appetizer or as a meal and I think it's a good soup to eat year round since it's not heavy at all. I made the soup a little healthier by using skinless chicken breasts and also by choosing fat free toppings. I hope you enjoy this soup as much as I did! Ingredients for Soup:
Preheat the oven to 350 degrees. Remove the skin from the chicken breasts, brush the breasts with olive oil and sprinkle generously with salt and pepper on both sides. Bake the chicken for 35-40 minutes, or until the breasts are cooked through. Set chicken aside and let it cool. Meanwhile, prepare your vegetables. Chop the onions, carrots and celery. Mince the garlic and jalapenos. Finally, crush the tomatoes. To crush the tomatoes, pout the can into a bowl and smash the whole tomatoes with a fork. Then, heat three tablespoons of olive oil on medium heat in a large pot or dutch oven and cook the carrots, celery, and onions in the pot for 10 minutes, or until the vegetables are crisp tender and the onions are starting to brown. Add the garlic to the pot and cook for 30 more seconds. Next, add the tomatoes and their puree to the pot along with the chicken stock, jalapenos, cumin, coriander, 1 teaspoon of pepper, and the cilantro. Bring the soup to a boil and then lower the heat and simmer for 25 minutes. Once the chicken is cool enough to handle, shred it with your hands (or a fork and knife) and add it to the pot. Serve the soup with a little bit of sliced avocado, a dollop of yogurt and some cheddar cheese. Yum!  *Updated on 01/14/10* My dad owned a restaurant pretty much my entire life and this restaurant had the best potato soup, by far. I almost never went there without ordering it. Of course, it was loaded with butter and cream so I haven't had it in years. Yesterday, I decided to attempt to remake the soup into a low fat version at home. I was really wary of how it would taste because of the fact that I was cutting out basically all of the important fats. I honestly thought that I might end up throwing away a couple of pounds of potatoes, along with a lot of onions and other ingredients. Amazingly, the outcome was creamy, rich, and delicious! The fat free half and half actually worked as a substitute, along with the low fat buttermilk. The toppings made all the difference too, the turkey bacon on top was the perfect flavoring to add that little extra "something" to every bite. I definitely recommend this recipe. It was so good that in two days, the huge pot is practically gone. I thought I would be freezing half of it, but there is barely any left! Ingredients for Soup:
Peel and chop the onions and set aside. Wash, peel, and chop the potatoes into large bite-sized cubes. This soup is not creamed at all, so the chunks cannot be too large to eat. Heat olive oil over medium low heat. Toss the onions in the olive oil and saute for a few minutes until soft and translucent. Add the flour to the onions, stir to coat the onions and then saute for 5 more minutes. After that, add the chicken stock, half and half, buttermilk and yogurt and stir continuously until smooth. Finally, add the spices, hot sauce, and potatoes. Stir some more and then cover the soup and simmer on low for 45 minutes to an hour, until the soup has thickened and the potatoes have cooked. Stir the soup occasionally and check the flavoring before serving. Add more salt or hot sauce if necessary. While the soup is simmering, cook the bacon. Chop the bacon and saute in a nonstick pan with some canola oil cooking spray until browned and cooked through and set aside. Chop a couple of green onions and set aside as well. Serve the soup hot with toppings. Enjoy this amazing and hearty soup! 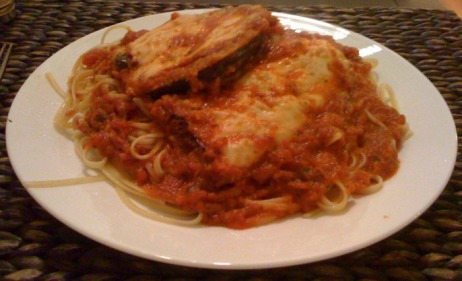 *I'm fully aware that this picture looks like a bunch of slop on the plate. I was too hungry to take decent pictures! :)* My husband loves eggplant, so he actually introduced me this dish. I have never really been into eating vegetarian meals for dinner, but this is absolutely amazing! Tonight was the first night I made this and we ate like pigs (as you can see from the humungous portion on the plate). This is actually a pretty easy recipe to make, and a great recipe to freeze. I had planned on making this last week but wasn't able to finish cooking it, so I froze the eggplant after breading it (before I even got a chance to fry it). Today I took it out of the freezer, fried, and baked it and it was perfect. This is definitely a great meal to prepare in advance and heat up later on when you are too tired to cook! Ingredients:
Preheat the oven to 400 degrees. Cut the eggplant into 1/2 inch circles and set aside. Prepare your breading assembly line by putting the 1/2 cup of flour into one bowl, the beaten egg whites into another bowl, and both breadcrumbs and rice parmesan into the last bowl. Make sure to mix the breadcrumbs and rice parmesan together well. Dip the eggplant rounds first in the flour, then in the egg, and finally in the breadcrumbs mixture. Make sure to let the excess egg drip off each piece before dipping into the breadcrumbs mixture. Pat the breadcrumbs onto the eggplant so that they adhere well. Set breaded eggplant pieces aside. Put half of 1 jar of tomato sauce into a large baking dish and set aside. Heat 2-3 tablespoons of olive oil in a large frying pan on medium or medium low heat. Fry the eggplant for 2-3 minutes on each side, or until they are browned and crispy (not burned!). You may need to add a little more olive oil if the eggplant soaks it all up while frying. Do this in batches until all the eggplant is fried. Place the fried eggplant in a single layer in the baking dish with tomato sauce. Pour the remaining half of the jar of sauce over all the pieces. Sprinkle parmesan cheese over the top of the eggplant pieces and bake for 25-30 minutes, or until the cheese is bubbly and soft. While the eggplant is baking, cook the pasta according to the package directions. Make sure to salt the pasta well. Also, in a small saucepan, heat the second jar of tomato sauce on medium-low heat until warmed through. Serve the eggplant on a bed of spaghetti with tomato sauce. Bon Appetit! :)  Last weekend I made a life changing discovery. That discovery was Jennie-O Extra Lean Turkey Bacon. I haven't had bacon in over five years because of my diet! This bacon is 100% Swank legal. One piece has only 0.5 grams of fat and 0 grams of saturated fat. I am so excited! I don't really plan on eating it with breakfast much, but bacon is so wonderful to use as flavoring in so many dishes. You will definitely see some bacon appearing on future recipes! Oh and the best part was, the bacon tastes great!
The first thing I decided to make with my new discovery is potato skins. I have made potato skins in the past, but they just aren't the same without bacon. Now they are perfect! These were delicious, so delicious that my husband felt it was necessary to tweet about them and eat them for breakfast :). Thanks to the Nov/Dec issue of the Clean Eating Magazine for publishing the recipe! Ingredients:
Preheat the oven to 425 degrees. First, scrub the potatoes clean. Then, poke them about five times each with a fork and rub them with a little olive oil. Sprinkle kosher salt on the outside of each potato and then place them in the oven, directly on the rack. Bake the potatoes for 50 minutes to an hour, or until the potatoes are completely tender. Once the potatoes are cooked, place them in a bag or container in the refrigerator for at least an hour and even overnight, until completely cooled. After they have cooled, cut each potato in half and scoop out the inside, leaving about half an inch of the potato in the skin. Mix together the cayenne, paprika and salt in a small prep bowl. Sprinkle the seasonings over each potato skin and spray each potato with a little olive oil cooking spray. Spray the baking sheet with the spray, put the potatoes on the sheet and then bake for 10 minutes. While the potatoes are baking, finely chop the turkey bacon until cooked through. After the potatoes are cooked, sprinkle each skin with some cheese, bacon pieces and green onions. Bake for another 3-5 minutes, or until the cheese is bubbly. Let the skins cool for a little, the put a little dollop of yogurt on each one. Eat hot, warm, or even cold if you want. They are that good! Print This Recipe!
Source: Tasty Treats By Michi Original Easy Balsamic Grilled Chicken Low Fat Creamed Spinach 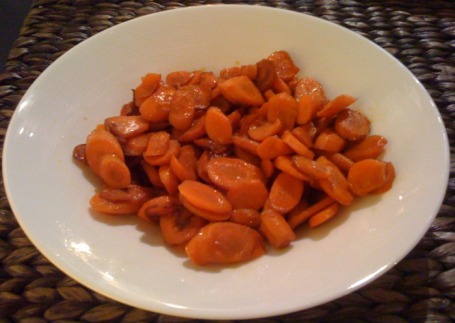 I had some leftover carrots after Thanksgiving that I didn't know what to do with. Usually I use carrots as a base for soups, roast them, or just snack on them raw, but I decided to try something quick and easy as a side for dinner last night. This came out extremely delicious and was a nice little break from our usual carrot recipes! Of course, it's low fat, healthy, and this time, also vegetarian and vegan friendly. I know some of my veggie followers have wanted more veggie recipes, so here's one for you! ;)
We had this with my Easy Balsamic Grilled Chicken recipe and it was a perfect combo with the chicken and the Low Fat Creamed Spinach. Recipe links above! Ingredients:
Cut the carrots into 1/4 inch slices at a diagonal. Heat the olive oil in a medium sized pan and sauté the carrots for about 8-10 minutes, or until cooked through and tender. Once the carrots are cooked, add the balsamic vinegar and brown sugar and stir to coat. That's it! Parents, I definitely think this would be a winner for kids. Who doesn't like vegetables with sugar on them? 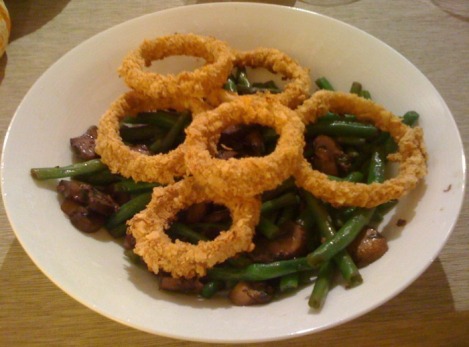 This was by far the best side we had at our Thanksgiving. The BEST. I wanted to incorporate green beans into our meal, but I'm not really a fan of the traditional soup based green bean casserole and unhealthy pre-made onion topping. I looked a little and found that Michael Chiarello has a new take on green bean casserole. After reading the ingredients online and watching a short clip on Food Network's website, I was sold. The meal did not disappoint and I cannot wait to make it for friends and family for Christmas! The caramelized mushrooms were perfect and the sauce was delicious.
I didn't want to add unnecessary fat by putting deep fried onion rings on top, so I referred to another favorite chef, Ellie Krieger. She has a wonderful baked onion ring recipe that went perfectly with this casserole! On a side note, I made a another find while making this recipe. The Kettle Brand has a line of baked chips that are so scrumptious. I will never buy baked Lays again! Ingredients for Green Bean "Casserole":
Bring a couple of quarts of salted water to boil. Boil the green beans for 4 minutes, drain well, and then transfer them to a pan or plate to cool. Heat the olive oil in a large skillet over medium heat. Add the mushrooms to the pan and cook until brown for about 4-5 minutes. Don't stir the mushrooms so that they can properly caramelize. After the mushrooms have cooked, add the minced garlic and the thyme. Season with sale and pepper and cook until the garlic is fragrant, about 3-5 minutes. Remove the pan from the heat and add the cognac. Return the pan to the heat and add the wine and chicken broth. Stir to combine and simmer until the sauce thickens, about 8-10 minutes. Finally, add the green beans to the mushroom sauce and then toss everything together. Taste the mixture and add salt and pepper to taste if necessary. Top with baked onion rings (recipe below). Serve immediately, or at room temperature. Baked Onion Ring Ingredients:
Directions: Preheat the oven to 450 degrees. Peel the onion and cut it into rings. After that, put the entire bag of Kettle Chips into the food processor and pulse them until they are fine crumbs. Then, put the onion rings into a zip-loc bag with 1/2 cup of flour. Shake the bag so that the onions are completely coated with the flour. Now, create an assembly line for your onion rings. In the first bowl, combine the buttermilk, 2 tablespoons of flour and pepper. In the second bowl, put the crumbs from the chips. Finally, dip each of the floured onion rings into the buttermilk mixture and then into the crumb mixture. Make sure to pat the crumb mixture on the onion rings so they stick. Place each onion ring on a baking sheet sprayed with olive oil cooking spray. Let the onions sit on the sheet for a few minutes before you put them into the oven. Spray the onion rings with more olive oil cooking spray and then bake for 20 minutes or until they are golden brown and crispy. Sprinkle more salt on top if necessary and place the onion rings on top of the casserole. These onion rings are also excellent as a side with many other dishes! Click to set custom HTML
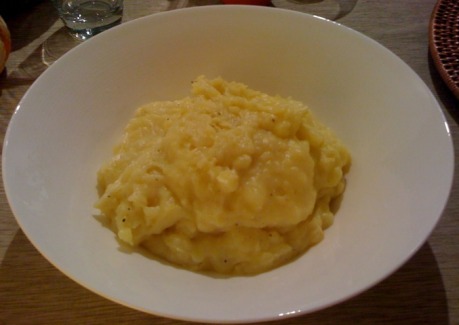 I love my usual garlic mashed potatoes, but sometimes you need something that isn't garlicy (I know that isn't a word) in order to go perfectly with your meal. Thanksgiving is a perfect example of when you need that non-garlic creaminess! Creaminess and low fat usually doesn't go together, but these mashed potatoes are great! Not surprisingly, they have one of my favorite ingredients in them. Greek yogurt. :)
Ingredients:
Once the potatoes are cooked, strain them and return them to the pot that they were cooked in. Then, heat the milk, buttermilk, and yogurt in a small saucepan on medium low heat. Stir the mixture to combine and do not let the milk boil. After the milk mixture has heated, add the milk to the potatoes. Using an immersion blender (or your favorite mashed potato making tool) mix the milk mixture and potatoes together until they are whipped and smooth. Add salt and pepper to taste. 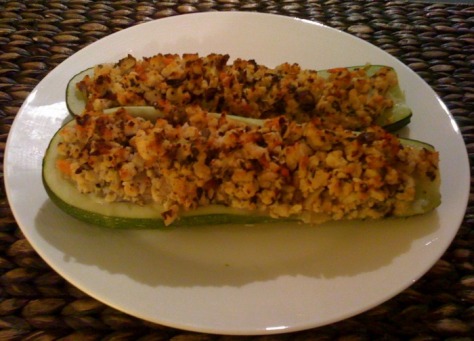 Andrew loves zucchini, so I was on the lookout for a good recipe that called for it. I came across this recipe on one of my favorite blog sites, http://annies-eats.com. The outcome was very yummy and the turkey almost tasted like sausage because of all the strong flavors. In fact, I think I am going to use this turkey mixture as a substitute for sausage in other recipes from now on! I also think this mixture would be amazing for stuffed mushrooms. Perhaps you will see a blog update in the near future with that experiment!
I made this recipe as a main dish, but after eating it I think it's better as an appetizer or side dish to another meal. Even though it has meat inside, we found ourselves wanting something else to go with it. I also think some plain yogurt would be a delicious addition to the top. Yum! Ingredients:
Preheat the oven to 375 degrees. Cut the zucchini in half lengthwise and scoop out the seeds and insides, leaving the shell about 1/4 inch thick. Save the soft part of insides of one of the zucchini and set aside. Prepare all your other ingredients. Chop the onion, mince the garlic, chop the mushrooms, herbs, etc. Heat 1 tablespoon of olive oil in a medium skillet over medium high heat. Saute the onions and garlic for a few minutes, until the onions are soft and translucent. After the onions are soft, add the mushrooms and zucchini insides. Saute for a couple of more minutes until the mushrooms are soft. Set aside In another medium sized skillet, heat 1 tablespoon of oil over medium high heat. Saute the ground turkey until its white and cooked through. Make sure to break up the turkey into tiny ground pieces. After the turkey has cooked, add the onion and mushroom mixture and stir well. Then add the wine, tomatoes, and herbs to the skillet as well. Stir and cook the mixture for another minute or two. Remove the pan from the heat and let the mixture cool for a few minutes. Once the mixture has cooled a little bit, add the egg, parmesan topping, salt, pepper and stir well. Scoop the turkey mixture into the zucchini halves. Pour water into the baking sheet so its about 1/4 inch high. Put the stuffed zucchini on the baking sheet and put in the oven for 40 minutes, or until the stuffing is golden brown. Serve immediately and enjoy this very healthy dish! |  AuthorMy name is Michelle Bolooki and I was diagnosed with Multiple Sclerosis in June 2002. I have been on the Swank MS Diet since April of 2005. I have created this blog in order to share some delicious and healthy low fat recipes that I have come across the last few years. Enjoy! CategoriesAll |
 RSS Feed