I received a comment on my blog from another blogger who asked permission to blog about my site (Yes, I'm aware that I just used the word "blog" three times in one sentence). This was a first and completely made my day! I actually hope it's a first of many since I really want to share my blog with other people, especially other Swankers. I remember when I started the Swank diet and I felt sooo limited in what I could eat. I was so freaked out thinking that I would accidentally cheat, that I pretty much just ate grilled chicken and veggies for a couple of weeks . Yummy, right? I knew I couldn't continue long that way. Later on I found the message board on the Swank site were other Swankers share their recipes. I was so happy! I had tried a couple of recipes from the diet book that were not great, and these people had tried and true recipes that sounded amazing. These Swankers were so helpful to me and they are what inspired me to start blogging, especially since I don't know of any other people on our diet that do. Anyway, meet Rae, another blogger and person with MS. Her blog, In It For The Parking (Awesome name!), is about her life and her MS and I already love reading it. She has a great story and awesome attitude, something that I find most people that try Swank do. I think the group of us that are willing to cut out butter, chocolate, fatty cheese, and a bunch of other awesomeness out of our diet are pretty positive go-getters that are willing to do anything to gain control of our illness! :). Rae doesn't seem to let MS get the better of her, which I really love. She is trying out Swank for the first time and stumbled across my blog, which I hope she finds works for well for her and makes her feel better soon! Below is the link to her blog entry and nod to Tasty Treats by Michi. Thanks again for the blog love, Rae! The things you wrote about it were so awesome and completely made my New Years. You have given me a little boost to continue blogging regularly, and have made me want to blog even now from the hospital bed! :)
26 Comments
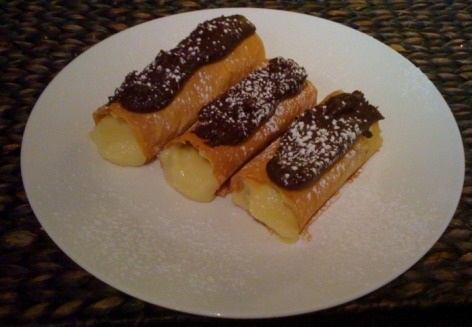 Okay, pre-diet, chocolate eclairs were my favorite dessert. I could not enter a bakery without buying one, it was that kind of obsession. Sometimes, I would actually buy two, which is pretty disturbing and gluttonous. :) Making any type of pastry into a diet friendly recipe is very very difficult. Pastry = butter and fat, which is off limits. Phyllo is pretty much the only way I have found to make these type of desserts. I came across a phyllo eclair recipe online, and although its time consuming and not as delicious as the original, it was quite tasty for being a "diet" version of an eclair. The filling exremely yummy and I used my own diet friendly chocolate frosting which is always a hit. The only downside is that since it's a phyllo shell, it falls apart pretty easily and is a little messy to eat! I may add more layers of phyllo next time, but that also adds fat so you have to watch out for that. Either way, I think it's worth the time if you are craving something with this flavoring and can't indulge in the real thing! Yum! Ingredients for Vanilla Cream Filling:
Ingredients for the Phyllo Shells:
Ingredients For the Chocolate Frosting (Makes large amount of frosting, you may want to half the recipe if you don't plan on using the frosting for something else):
First, make the vanilla cream. Begin by beating together the sugar, cornstarch, salt, egg yolks, and egg whites together in a small saucepan on low heat. Beat well until all the ingredients are incorporated. Then add the skim milk and half and half, beating constantly. Raise the heat and bring the mixture to a boil, continuing to beat. *Make sure you have a large egg beater for this!* Once the cream filling is boiling, beat for two more minutes and then reduce to a simmer, continuously beating for a few more minutes. The filling should be thick and creamy at this point. Set the mixture aside and add the vanilla extract and beat some more. Beating is the key to making the cream filling! Transfer the cream filling to a mixing bowl, cover it with saran wrap, and set it in the refrigerator to chill. Next, create the chocolate frosting. Begin by sifting the powdered sugar, salt and cocoa powder together, then set aside. After that, heat the vegetable oil on medium low heat in a large saucepan. Add the marshmallows and stir continuously until they are melted. After that, add the milk, powdered sugar, cocoa powder, and vanilla extract. Stir until the mixture turns into frosting consistency. Set aside (do not refrigerate, it will harden!). Finally, it's time to create the phyllo shells. First, create tinfoil molds that you will use to create the shells. Cut six pieces of tinfoil into 12 inch x 6 inch rectangles. Take each tin foil rectangle and roll it up, in a jelly roll fashion, leaving about a 1 inch opening in the middle. Spray each tin foil mold with canola oil and sprinkle them with a little sugar. Now, take two pieces of phyllo stacked on top of each other and cut them into thirds lengthwise. Spray the phyllo with the canola oil and sprinkle with sugar. Place a tinfoil roll on one stack of a phyllo strip and roll it up in a jelly roll fashion. Spray the phyllo roll with canola and sprinkle with sugar. Place the roll on a cookie sheet with wax paper or sprayed with canola oil. Repeat again until you get 6 rolls. This will require 4 sheets of phyllo. (refer to picture below if you need some guidance) Place the phyllo rolls in the oven and bake for 8-10 minutes, or until golden brown. Once they are cooked, transfer the rolls to a wire rack to cool completely. I found that placing a knife in the center of the roll is the easiest way to transfer the rolls to the cooling rack. Once the phyllo rolls have cooled, twist the ends of the tin foil until they are loosened from the phyllo itself and gently pull the tinfoil out from the phyllo roll. Be careful, the phyllo is delicate! Now you can finally assemble the eclairs. Transfer the cream filling to a piping bag or a zip-loc bag with a hole snipped off of the end. Pipe the filling inside the eclair. Do the same with the chocolate frosting. Transfer the frosting to a piping bag or zip-loc back with a hole snipped off of the end. Pipe some frosting on the top of the eclair. Dust with some powder sugar, and finally...ENJOY! Serve immediately, phyllo will wilt and become soft in the ref I know this seems like a lot of work, but if you are having a lazy Sunday like I was, it's worth it! :) 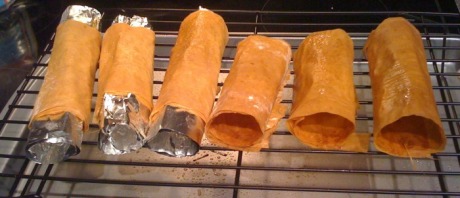 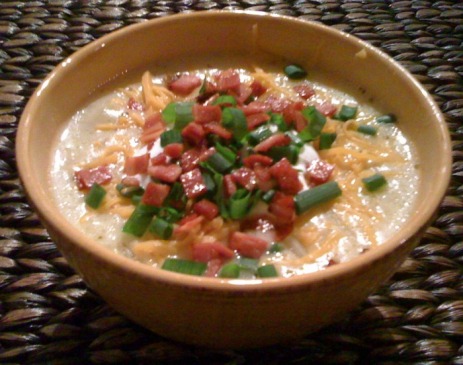 *Updated on 01/14/10* My dad owned a restaurant pretty much my entire life and this restaurant had the best potato soup, by far. I almost never went there without ordering it. Of course, it was loaded with butter and cream so I haven't had it in years. Yesterday, I decided to attempt to remake the soup into a low fat version at home. I was really wary of how it would taste because of the fact that I was cutting out basically all of the important fats. I honestly thought that I might end up throwing away a couple of pounds of potatoes, along with a lot of onions and other ingredients. Amazingly, the outcome was creamy, rich, and delicious! The fat free half and half actually worked as a substitute, along with the low fat buttermilk. The toppings made all the difference too, the turkey bacon on top was the perfect flavoring to add that little extra "something" to every bite. I definitely recommend this recipe. It was so good that in two days, the huge pot is practically gone. I thought I would be freezing half of it, but there is barely any left! Ingredients for Soup:
Peel and chop the onions and set aside. Wash, peel, and chop the potatoes into large bite-sized cubes. This soup is not creamed at all, so the chunks cannot be too large to eat. Heat olive oil over medium low heat. Toss the onions in the olive oil and saute for a few minutes until soft and translucent. Add the flour to the onions, stir to coat the onions and then saute for 5 more minutes. After that, add the chicken stock, half and half, buttermilk and yogurt and stir continuously until smooth. Finally, add the spices, hot sauce, and potatoes. Stir some more and then cover the soup and simmer on low for 45 minutes to an hour, until the soup has thickened and the potatoes have cooked. Stir the soup occasionally and check the flavoring before serving. Add more salt or hot sauce if necessary. While the soup is simmering, cook the bacon. Chop the bacon and saute in a nonstick pan with some canola oil cooking spray until browned and cooked through and set aside. Chop a couple of green onions and set aside as well. Serve the soup hot with toppings. Enjoy this amazing and hearty soup! 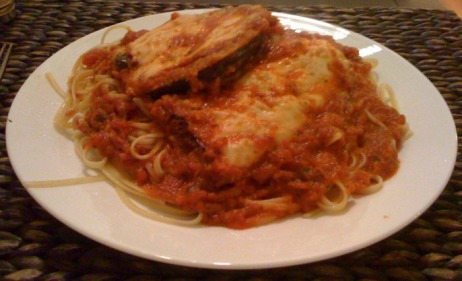 *I'm fully aware that this picture looks like a bunch of slop on the plate. I was too hungry to take decent pictures! :)* My husband loves eggplant, so he actually introduced me this dish. I have never really been into eating vegetarian meals for dinner, but this is absolutely amazing! Tonight was the first night I made this and we ate like pigs (as you can see from the humungous portion on the plate). This is actually a pretty easy recipe to make, and a great recipe to freeze. I had planned on making this last week but wasn't able to finish cooking it, so I froze the eggplant after breading it (before I even got a chance to fry it). Today I took it out of the freezer, fried, and baked it and it was perfect. This is definitely a great meal to prepare in advance and heat up later on when you are too tired to cook! Ingredients:
Preheat the oven to 400 degrees. Cut the eggplant into 1/2 inch circles and set aside. Prepare your breading assembly line by putting the 1/2 cup of flour into one bowl, the beaten egg whites into another bowl, and both breadcrumbs and rice parmesan into the last bowl. Make sure to mix the breadcrumbs and rice parmesan together well. Dip the eggplant rounds first in the flour, then in the egg, and finally in the breadcrumbs mixture. Make sure to let the excess egg drip off each piece before dipping into the breadcrumbs mixture. Pat the breadcrumbs onto the eggplant so that they adhere well. Set breaded eggplant pieces aside. Put half of 1 jar of tomato sauce into a large baking dish and set aside. Heat 2-3 tablespoons of olive oil in a large frying pan on medium or medium low heat. Fry the eggplant for 2-3 minutes on each side, or until they are browned and crispy (not burned!). You may need to add a little more olive oil if the eggplant soaks it all up while frying. Do this in batches until all the eggplant is fried. Place the fried eggplant in a single layer in the baking dish with tomato sauce. Pour the remaining half of the jar of sauce over all the pieces. Sprinkle parmesan cheese over the top of the eggplant pieces and bake for 25-30 minutes, or until the cheese is bubbly and soft. While the eggplant is baking, cook the pasta according to the package directions. Make sure to salt the pasta well. Also, in a small saucepan, heat the second jar of tomato sauce on medium-low heat until warmed through. Serve the eggplant on a bed of spaghetti with tomato sauce. Bon Appetit! :) 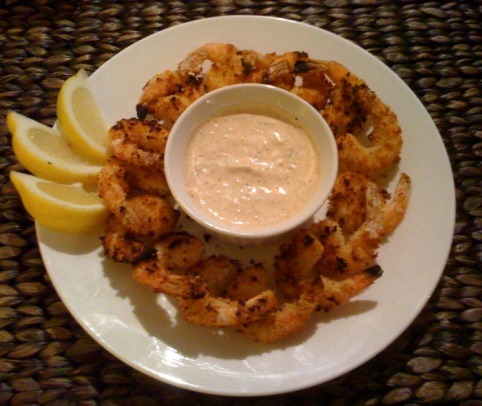 I will never feel the need to eat fried shrimp again. These shrimp are so crunchy and flavorful, you really do not miss the fried version one bit. I think the broiler has a lot to do with it and I may start using the broiler more often for other "oven fried" dishes I make! They are perfect with the usual cocktail sauce, but if you want something a little different than the norm, you should definitely try the chili-lime dipping sauce listed below, which was simply delectable.
These are great as an appetizer for a party or also for dinner with some potato wedges and ketchup on the side. I love appetizers for dinner! This recipe was inspired by Ellie Krieger, and she continues to surprise me with her amazing and healthy recipes. However, her cooking time and directions were way off on this one. I had to alter the cooking time greatly in order to keep the shrimp from burning to a crisp. If you refer to the original recipe, I highly recommend that you use my recommended cooking time instead. Enjoy! Ingredients for Chili-Lime Dipping Sauce:
To make the dipping sauce, combine the yogurt, mayonnaise, lime juice, chili powder, lime zest, and salt. Taste for flavorings and put in the refrigerator until ready to serve. To make the shrimp, begin by defrosting the shrimp (if bought frozen). I find the easiest way to do this is by putting the frozen shrimp in a colander and tossing it with cold water until all the frost is off the shrimp and they are soft and ready to handle. Once the shrimp is ready, prepare your assembly line of breading. First, add the chili powder, salt and pepper to the flour in a medium sized and stir well to combine. Next, beat the egg whites in another bowl until fluffy. Last, mix the bread crumbs, salt and pepper in a third bowl. Toss the shrimp in the bowl with the flour until coated lightly. Dip each shrimp in the egg white mixture, letting the excess drip off, and then dip it in the breading. Making sure to pat the breading on the shrimp so it adheres well. Place each shrimp on wax paper and set aside. Coat a baking sheet with two tablespoons of canola oil and put under the broiler for 2 minutes until heated. Remove the heated baking sheet and add the shrimp to the sheet in even rows. Spray the shrimp lightly with canola oil spray and put it back in the broiler for 2 minutes or until crisp and golden brown. Watch the broiler carefully to ensure that the shrimp does not burn. After that, remove the sheet from the broiler, turn each shrimp over carefully, spray them again lightly with canola oil, and return the shrimp to the broiler for another 2 minutes or until crisp and golden brown. Remember to watch the broiler carefully the entire time. That's it! Serve the shrimp hot or at room temperature with the chili-lime dipping sauce or some cocktail sauce. Stay tuned with blog updates on variations of this recipe, the flavoring options are endless! :) 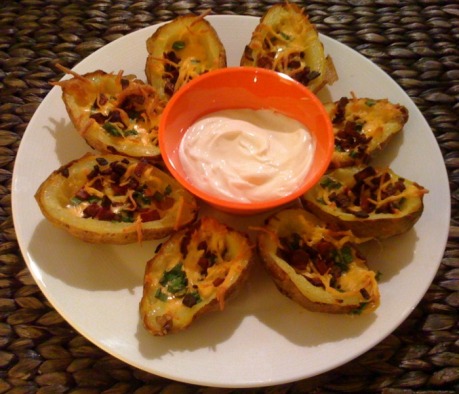 Last weekend I made a life changing discovery. That discovery was Jennie-O Extra Lean Turkey Bacon. I haven't had bacon in over five years because of my diet! This bacon is 100% Swank legal. One piece has only 0.5 grams of fat and 0 grams of saturated fat. I am so excited! I don't really plan on eating it with breakfast much, but bacon is so wonderful to use as flavoring in so many dishes. You will definitely see some bacon appearing on future recipes! Oh and the best part was, the bacon tastes great!
The first thing I decided to make with my new discovery is potato skins. I have made potato skins in the past, but they just aren't the same without bacon. Now they are perfect! These were delicious, so delicious that my husband felt it was necessary to tweet about them and eat them for breakfast :). Thanks to the Nov/Dec issue of the Clean Eating Magazine for publishing the recipe! Ingredients:
Preheat the oven to 425 degrees. First, scrub the potatoes clean. Then, poke them about five times each with a fork and rub them with a little olive oil. Sprinkle kosher salt on the outside of each potato and then place them in the oven, directly on the rack. Bake the potatoes for 50 minutes to an hour, or until the potatoes are completely tender. Once the potatoes are cooked, place them in a bag or container in the refrigerator for at least an hour and even overnight, until completely cooled. After they have cooled, cut each potato in half and scoop out the inside, leaving about half an inch of the potato in the skin. Mix together the cayenne, paprika and salt in a small prep bowl. Sprinkle the seasonings over each potato skin and spray each potato with a little olive oil cooking spray. Spray the baking sheet with the spray, put the potatoes on the sheet and then bake for 10 minutes. While the potatoes are baking, finely chop the turkey bacon until cooked through. After the potatoes are cooked, sprinkle each skin with some cheese, bacon pieces and green onions. Bake for another 3-5 minutes, or until the cheese is bubbly. Let the skins cool for a little, the put a little dollop of yogurt on each one. Eat hot, warm, or even cold if you want. They are that good! Print This Recipe!
Source: Tasty Treats By Michi Original Easy Balsamic Grilled Chicken Low Fat Creamed Spinach 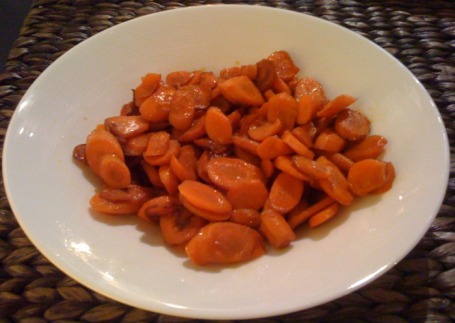 I had some leftover carrots after Thanksgiving that I didn't know what to do with. Usually I use carrots as a base for soups, roast them, or just snack on them raw, but I decided to try something quick and easy as a side for dinner last night. This came out extremely delicious and was a nice little break from our usual carrot recipes! Of course, it's low fat, healthy, and this time, also vegetarian and vegan friendly. I know some of my veggie followers have wanted more veggie recipes, so here's one for you! ;)
We had this with my Easy Balsamic Grilled Chicken recipe and it was a perfect combo with the chicken and the Low Fat Creamed Spinach. Recipe links above! Ingredients:
Cut the carrots into 1/4 inch slices at a diagonal. Heat the olive oil in a medium sized pan and sauté the carrots for about 8-10 minutes, or until cooked through and tender. Once the carrots are cooked, add the balsamic vinegar and brown sugar and stir to coat. That's it! Parents, I definitely think this would be a winner for kids. Who doesn't like vegetables with sugar on them? 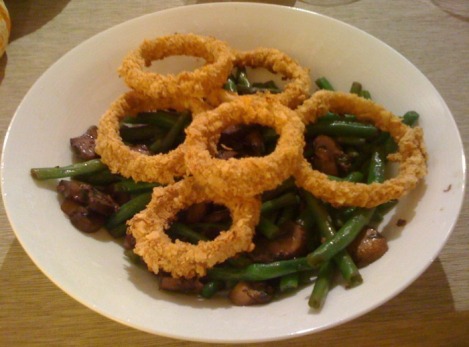 This was by far the best side we had at our Thanksgiving. The BEST. I wanted to incorporate green beans into our meal, but I'm not really a fan of the traditional soup based green bean casserole and unhealthy pre-made onion topping. I looked a little and found that Michael Chiarello has a new take on green bean casserole. After reading the ingredients online and watching a short clip on Food Network's website, I was sold. The meal did not disappoint and I cannot wait to make it for friends and family for Christmas! The caramelized mushrooms were perfect and the sauce was delicious.
I didn't want to add unnecessary fat by putting deep fried onion rings on top, so I referred to another favorite chef, Ellie Krieger. She has a wonderful baked onion ring recipe that went perfectly with this casserole! On a side note, I made a another find while making this recipe. The Kettle Brand has a line of baked chips that are so scrumptious. I will never buy baked Lays again! Ingredients for Green Bean "Casserole":
Bring a couple of quarts of salted water to boil. Boil the green beans for 4 minutes, drain well, and then transfer them to a pan or plate to cool. Heat the olive oil in a large skillet over medium heat. Add the mushrooms to the pan and cook until brown for about 4-5 minutes. Don't stir the mushrooms so that they can properly caramelize. After the mushrooms have cooked, add the minced garlic and the thyme. Season with sale and pepper and cook until the garlic is fragrant, about 3-5 minutes. Remove the pan from the heat and add the cognac. Return the pan to the heat and add the wine and chicken broth. Stir to combine and simmer until the sauce thickens, about 8-10 minutes. Finally, add the green beans to the mushroom sauce and then toss everything together. Taste the mixture and add salt and pepper to taste if necessary. Top with baked onion rings (recipe below). Serve immediately, or at room temperature. Baked Onion Ring Ingredients:
Directions: Preheat the oven to 450 degrees. Peel the onion and cut it into rings. After that, put the entire bag of Kettle Chips into the food processor and pulse them until they are fine crumbs. Then, put the onion rings into a zip-loc bag with 1/2 cup of flour. Shake the bag so that the onions are completely coated with the flour. Now, create an assembly line for your onion rings. In the first bowl, combine the buttermilk, 2 tablespoons of flour and pepper. In the second bowl, put the crumbs from the chips. Finally, dip each of the floured onion rings into the buttermilk mixture and then into the crumb mixture. Make sure to pat the crumb mixture on the onion rings so they stick. Place each onion ring on a baking sheet sprayed with olive oil cooking spray. Let the onions sit on the sheet for a few minutes before you put them into the oven. Spray the onion rings with more olive oil cooking spray and then bake for 20 minutes or until they are golden brown and crispy. Sprinkle more salt on top if necessary and place the onion rings on top of the casserole. These onion rings are also excellent as a side with many other dishes! 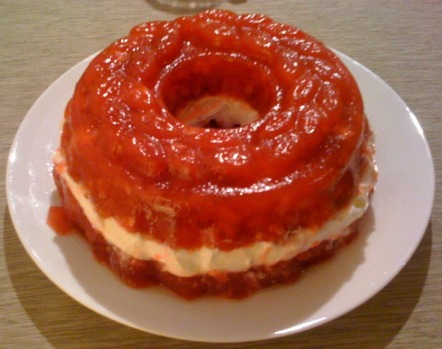 This jello has been a staple for the holidays for the last few years, and even though we only had a Thanksgiving for two, I had to make it for the first time! It is that sweet, cold, crunchy textured dish that you need to even out the rest of the sides you are eating on Thanksgiving. This is a favorite in our household and most often referred to as "refreshing" :) (that's an inside joke for my family). Try this recipe, it's easy and delicious! Thanks to my sister-in-law, Lynn, to introducing it to us!
Ingredients:
Directions: Begin by preparing your ingredients. Strain the pineapple and make sure to remove all the liquid, chop the walnuts and slice the strawberries. Then, make the jello according to the package directions. Make sure to use 1/2 cup less water than listed on the package. You will already have some extra liquid from the strawberries and the juice that is inside the pineapple. Add the strawberries, walnut, and pineapple to the jello mixture. Spray your jello mold with canola spray. Pour the mixture into the sprayed mold , filling it halfway. Refrigerate the mold for at least 4 hours, so the mixture has time to harden. Then, add the 3/4 cup of non-fat yogurt in an even layer on top of the jello inside the mold. Finally, add more jello mixture to fill the mold. Cover the mold with some saran wrap and refrigerate overnight. *If you have any extra jello mixture, put it in another container to refrigerate and enjoy later.* Leave the mold in the refrigerator until you are ready to serve. Once ready, put the mold in a small mixing bowl filed with warm water. Use a knife to slide around the mixture inside mold and then flip the mold out onto a plate carefully. Serve immediately and enjoy! Refrigerate any leftovers immediately before the mold melts and turns into a slop :). Click to set custom HTML
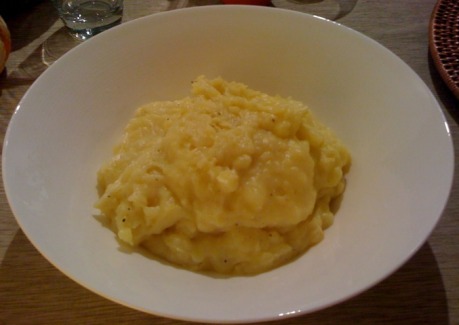 I love my usual garlic mashed potatoes, but sometimes you need something that isn't garlicy (I know that isn't a word) in order to go perfectly with your meal. Thanksgiving is a perfect example of when you need that non-garlic creaminess! Creaminess and low fat usually doesn't go together, but these mashed potatoes are great! Not surprisingly, they have one of my favorite ingredients in them. Greek yogurt. :)
Ingredients:
Once the potatoes are cooked, strain them and return them to the pot that they were cooked in. Then, heat the milk, buttermilk, and yogurt in a small saucepan on medium low heat. Stir the mixture to combine and do not let the milk boil. After the milk mixture has heated, add the milk to the potatoes. Using an immersion blender (or your favorite mashed potato making tool) mix the milk mixture and potatoes together until they are whipped and smooth. Add salt and pepper to taste. |  AuthorMy name is Michelle Bolooki and I was diagnosed with Multiple Sclerosis in June 2002. I have been on the Swank MS Diet since April of 2005. I have created this blog in order to share some delicious and healthy low fat recipes that I have come across the last few years. Enjoy! CategoriesAll |
 RSS Feed