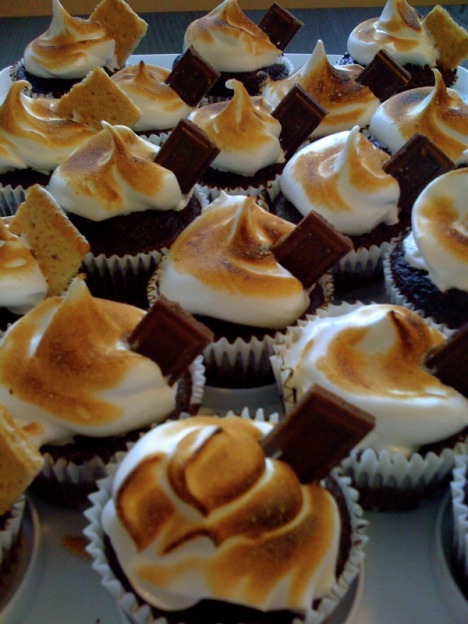
 Did you read the title of this blog? Be prepared. This is the most amazing thing you will ever eat. I am not kidding, it really is hands down the best cupcake ever! I came across this recipe on a blog, and I knew that even with my dietary alterations, they would still be divine. How can graham cracker, chocolate cake, and toasted meringue frosting be bad? It simply can't be.
Even though I saw this months ago, I needed to make a necessary purchase before attempting them. As you can see from the picture, the marshmallows are perfectly toasted (just like a real s'more!). That fun part is done with a kitchen torch. I didn't have one and was seriously going to purchase one just for these cupcakes (and you should too if you don't have one). Luckily, my sister had one that she didn't use, so I just stole it from her kitchen. I finally had an occasion to make them and was so excited for the experience. Just making them is fun! The final product doesn't only look impressive, but tastes amazing. Each bite has graham, chocolate, and toasted meringue - better than a s'more! I garnished each cupcake with either a graham cracker (for us health conscious folks) or a Hershey's chocolate. Everyone at the party loved them and they were devoured quickly. I know I will be making this frequently in the future! Try them! They are a perfect summer dessert. Ingredients: For the graham cracker crust:
Preheat the oven to 350 degrees. Line two cupcake pans with liners. Using a food processor, grind the graham crackers into fine crumbs. Add the oil and syrup and pulse until combined. Place one tablespoon of graham cracker crumbs into each cupcake liner. Press the crackers down in each cup with the help of a bottle, glass, spoon, etc. The flat back of my espresso measuring spoon was perfect for this. Bake the graham crackers for 5 minutes in the oven. Remove the pans and set aside, keep the oven on. In a large mixing bowl, sift together the sugar, flour, cocoa powder, baking powder, baking soda, and salt. Mix well. In the bowl of a standing mixer, mix together the eggs, skim milk, vegetable oil, and vanilla extract. Add the dry ingredients to the wet and mix on low for 30 seconds. Scrape the side of the bowl and mix on high for 2 minutes. Meanwhile, boil the water in the microwave or on the stove top. Add the boiling water to the batter and mix to combine. The batter will be thin. Fill each liner about 3/4 the way full with batter. Place the cupcakes in the oven and bake for 18-20 minutes or until a tester comes out clean. Make sure to rotate the pan once while baking. Let the cupcakes cool in the pan for 5 minutes and then cool completely on a wire rack. After the cupcakes have completely cooled, make the frosting. Note: make the frosting the day you want to eat the cupcakes, the meringue will not maintain well over a day or two. I made the cupcakes the day before the event and then the frosting the day of the event. Using a double boiler (I just put a large mixing bowl over a medium pot of simmering water), whisk together the eggs, sugar, and cream of tartar. Whisk constantly until an instant read thermometer inserted into the mixture reads 160 degrees. At that point, put the mixture into the bowl of a standing mixture fitted with the whisk attachment. Start whisking on low and the gradually move up the speed to medium high. Let mix for a few minutes until stiff, glossy peaks are formed. Be patient, this may take a while! Once you have stiff peaks, mix in the vanilla extract. Using a piping bag or zip lock bag with the corner cut off, pipe some frosting on each cupcake in a swirl pattern. Then, using a kitchen torch, toast the top of each cupcake. Be prepared to quickly blow out some little fires if the torch accidentally makes the cupcake liner catch fire :). Garnish the cupcakes with a piece of graham cracker or a Hershey chocolate. Serve the same day and enjoy! Be prepared to receive lots of compliments!
98 Comments
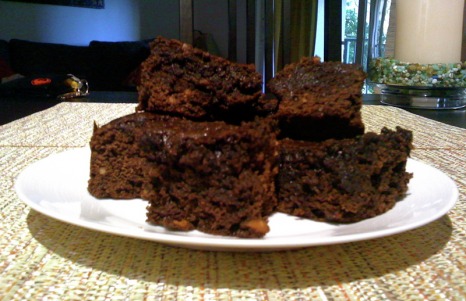 I have officially perfected Swank-friendly brownies! In fact, I have gone back and deleted my previous brownie post, because there is just no point in keeping it up anymore. These brownies are rich and decadent, and not "diet" tasting at all. The previous brownies were delicious, but they didn't have that level of richness that all brownies need. Since they were missing a little something, I decided to test the recipe again and this time added dark chocolate cocoa powder, a little white sugar, skim milk, and vanilla extract. That paired with cooking the brownies at a perfect temperature turned out to be an ah-mazing brownie.
These brownies are in no way fat free, but being that they don't have butter, real chocolate, or any other ingredients high in saturated fat, they are quite impressive. Definitely try them! Yum! Ingredients:
Preheat the oven to 350 degrees. Sift together the flour, baking powder, salt, raw sugar, brown sugar and white sugar together in a large mixing bowl. The raw sugar may not fit through your sifter, so just pour the remains in the bowl with the other ingredients. Stir well with a wooden spoon. In the bowl of a standing mixer, mix together the eggs and egg whites. Gradually at the vegetable oil to the eggs. Add the applesauce and mix some more. Slowly add the dry ingredients to the wet. Scrape the bowl to ensure all the ingredients are evenly incorporated. Add the peanut butter to the mixture and mix again. After that, add the cocoa powder, skim milk, and vanilla extract. Mix, mix, mix. Pour the brownie batter into 9x9 inch cooking pan greased with nonstick cooking spray. Cook 35-40 minutes or until a tester comes out almost clean (make sure not to overcook them!). Tip: Spray the measuring cup with nonstick spray in order to coax the peanut butter to slide right out. Let the brownies cool completely before cutting. 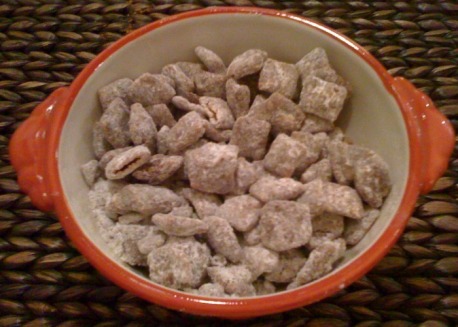 I'll give you one guess as to why this delicious dessert and snack is called Puppy Chow. Did you figure it out? It looks like dog food! I think even if I had a good camera (not my iphone) this dish would still look pretty ugly. But, I don't care what it looks like, its sooo darn good. I mean how can chocolate, peanut butter, and powdered sugar mixed with cereal be bad? This is so yummy, and so easy to make too.
The original recipe calls for melted chocolate, so this recipe uses a chocolate sauce as a substitute that is made from cocoa powder. You really do not notice the difference at all in the consistency of the dessert. Even though this dessert is low fat and Swank-friendly, it's definitely not healthy. There is tons of sugar in it, so be aware of that. But, we all have to indulge sometimes, right? I hope you enjoy this recipe as much as we do! Ingredients:
Using a large microwave safe bowl, whisk together the cocoa powder and canola oil. Whisk until smooth and the cocoa and oil are completely incorporated. Then, add 1/4 cup of the powdered sugar and 1 tablespoon of skim milk. Whisk until smooth. Continue adding the remaining powdered sugar and remaining milk the entire cup of powdered sugar and four tablespoons of skim milk are mixed in with the cocoa and canola oil. Next, add the creamy peanut butter to the mixture. Whisk more until the mixture is smooth again. Now, microwave the mixture for 30 seconds. Add the cereal to the chocolate mixture and stir together using a large spatula. Finally, transfer the cereal mixture to a sealable bag or container along with the remaining one and a half cups of powdered sugar. Shake the bag or container well several times. Make sure that powdered sugar is covering each piece of cereal. You don't want the cereal to clump together, so mix, mix, mix! After mixing, put the cereal in the freezer for 15 minutes and serve immediately. Store the remaining cereal in the refrigerator to enjoy later. :) 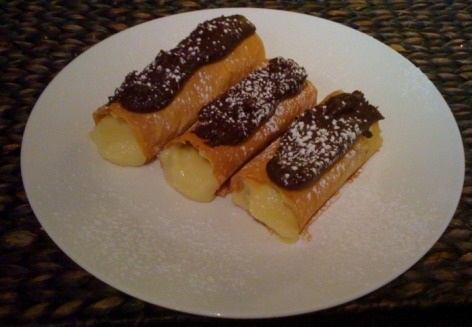 Okay, pre-diet, chocolate eclairs were my favorite dessert. I could not enter a bakery without buying one, it was that kind of obsession. Sometimes, I would actually buy two, which is pretty disturbing and gluttonous. :) Making any type of pastry into a diet friendly recipe is very very difficult. Pastry = butter and fat, which is off limits. Phyllo is pretty much the only way I have found to make these type of desserts. I came across a phyllo eclair recipe online, and although its time consuming and not as delicious as the original, it was quite tasty for being a "diet" version of an eclair. The filling exremely yummy and I used my own diet friendly chocolate frosting which is always a hit. The only downside is that since it's a phyllo shell, it falls apart pretty easily and is a little messy to eat! I may add more layers of phyllo next time, but that also adds fat so you have to watch out for that. Either way, I think it's worth the time if you are craving something with this flavoring and can't indulge in the real thing! Yum! Ingredients for Vanilla Cream Filling:
Ingredients for the Phyllo Shells:
Ingredients For the Chocolate Frosting (Makes large amount of frosting, you may want to half the recipe if you don't plan on using the frosting for something else):
First, make the vanilla cream. Begin by beating together the sugar, cornstarch, salt, egg yolks, and egg whites together in a small saucepan on low heat. Beat well until all the ingredients are incorporated. Then add the skim milk and half and half, beating constantly. Raise the heat and bring the mixture to a boil, continuing to beat. *Make sure you have a large egg beater for this!* Once the cream filling is boiling, beat for two more minutes and then reduce to a simmer, continuously beating for a few more minutes. The filling should be thick and creamy at this point. Set the mixture aside and add the vanilla extract and beat some more. Beating is the key to making the cream filling! Transfer the cream filling to a mixing bowl, cover it with saran wrap, and set it in the refrigerator to chill. Next, create the chocolate frosting. Begin by sifting the powdered sugar, salt and cocoa powder together, then set aside. After that, heat the vegetable oil on medium low heat in a large saucepan. Add the marshmallows and stir continuously until they are melted. After that, add the milk, powdered sugar, cocoa powder, and vanilla extract. Stir until the mixture turns into frosting consistency. Set aside (do not refrigerate, it will harden!). Finally, it's time to create the phyllo shells. First, create tinfoil molds that you will use to create the shells. Cut six pieces of tinfoil into 12 inch x 6 inch rectangles. Take each tin foil rectangle and roll it up, in a jelly roll fashion, leaving about a 1 inch opening in the middle. Spray each tin foil mold with canola oil and sprinkle them with a little sugar. Now, take two pieces of phyllo stacked on top of each other and cut them into thirds lengthwise. Spray the phyllo with the canola oil and sprinkle with sugar. Place a tinfoil roll on one stack of a phyllo strip and roll it up in a jelly roll fashion. Spray the phyllo roll with canola and sprinkle with sugar. Place the roll on a cookie sheet with wax paper or sprayed with canola oil. Repeat again until you get 6 rolls. This will require 4 sheets of phyllo. (refer to picture below if you need some guidance) Place the phyllo rolls in the oven and bake for 8-10 minutes, or until golden brown. Once they are cooked, transfer the rolls to a wire rack to cool completely. I found that placing a knife in the center of the roll is the easiest way to transfer the rolls to the cooling rack. Once the phyllo rolls have cooled, twist the ends of the tin foil until they are loosened from the phyllo itself and gently pull the tinfoil out from the phyllo roll. Be careful, the phyllo is delicate! Now you can finally assemble the eclairs. Transfer the cream filling to a piping bag or a zip-loc bag with a hole snipped off of the end. Pipe the filling inside the eclair. Do the same with the chocolate frosting. Transfer the frosting to a piping bag or zip-loc back with a hole snipped off of the end. Pipe some frosting on the top of the eclair. Dust with some powder sugar, and finally...ENJOY! Serve immediately, phyllo will wilt and become soft in the ref I know this seems like a lot of work, but if you are having a lazy Sunday like I was, it's worth it! :) 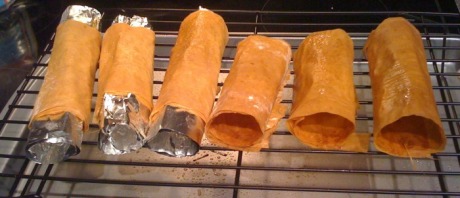 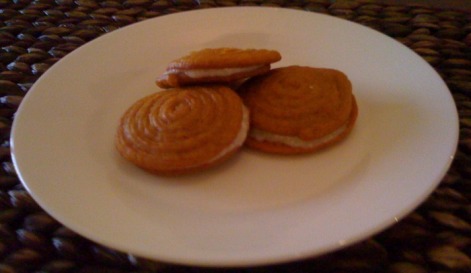 Don't these remind you of the Little Debbies Oatmeal Creme Pies? I used to eat those almost everyday with my lunch at school. Ahh memories...
I found this recipe on The Pioneer Woman's website, under the "Tasty Kitchen" section. This recipe is certainly tasty. The recipe was listed as easy, and personally I didn't find it too easy. I bake a lot and can usually do it with my eyes closed and very quickly, and these cookies felt like they took forever! I am not that skilled with the piping bag, which may have been a factor, and my own cream cheese frosting recipe didn't go as planned, so that added to the time as well. Being on the Swank diet, I can't eat full fat, or even 1/3 fat cream cheese, so I had to make the frosting with fat free cream cheese. The result tasted very good, but came out more as a glaze than as a frosting per say. I think I will make these cookies again, they do taste amazing, I will just go into it knowing that I need some time. :) Ingredients for the Cookies:
Preheat the oven to 350 degrees. Beat together brown sugar, sugar, oil and pumpkin. Add eggs one at a time, mixing well after each addition, followed by the vanilla. In a separate bowl, sift together the dry ingredients. Slowly incorporate the dry ingredients into the wet until just combined. Using a pastry bag with a round tip, or a big zip loc bag with one corner snipped, squeeze out concentric circles of batter, starting from the middle and working outward until the circles are about 2 inches in diameter. Bake for 11 minutes and cool on a rack. Beat together the cream cheese, sifted powdered sugar, and vanilla. Add the yogurt to help thicken the frosting a big. Add more cream cheese as well if necessary. The frosting is not thick, it is more of a glaze. Frost flat side of half the pies and top with another piece. Enjoy right away or chill over night. 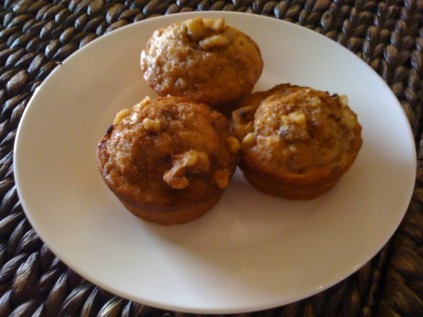 The bananas went rotten in the house (it's hard to buy fruit when only two people are eating it!) so I decided to make some banana bread. I had a momentary freak out because I cannot find my bread loaf pan, but then I decided I would just make banana nut muffins instead. They came out absolutely amazing! This is actually a recipe from the Swank MS Diet book, I just altered it slightly. Yum!
Ingredients:
Preheat the oven to 350 degrees. In a large mixing bowl, sift together the flour, baking soda, and salt. Set aside. Break peeled bananas in chunks and place in standing mixer. Blend on low for a few seconds, then on high until bananas are completely mashed and smooth. Add yogurt, sugar, eggs, and vanilla extract. Gradually add the oil and mix some more. Once the mixture is smooth, gradually add the flour mixture to the banana mixture and mix everything together by hand. Scrape the sides of the bowl and continue mixing until everything is incorporated and smooth. Spray a cupcake pan with Pam for Baking and fill each cup halfway with the batter. Sprinkle some brown sugar, cinnamon, and nuts on the top of each cupcake. Bake for 12-15 minutes or until a toothpick comes out clean and the edges of the cupcakes are slightly browned. Enjoy this delicious treat!  I love cookies!! I learned to bake cookies from my sister and we would bake cookies every year for Christmas for one or two days. I absolutely loved it! When I started my diet, I couldn't eat a single one of my favorite cookie recipes anymore. I have since found many delicious cookie recipes that are diet friendly, and peanut butter cookies are one of them. This recipe is easy and delicious and I love the yummy peanut butter taste. My favorite way to eat them is warm out of the oven with a glass of milk. Enjoy! :)
Ingredients:
Directions Preheat oven to 350 degrees. Beat the egg. Add the sugars gradually, then the oil, vanilla extract, and peanut butter. Scrape the bowl and beat well. In a separate bowl, combine the flour, baking powder, baking soda, and salt. I usually use a sieve to combine these ingredients. Slowly add the dry ingredients into the peanut butter mixture. Add three tablespoons of milk and mix well until blended. Using a cookie scoop or spoon, form the dough into balls that are about one inch in diameter. Roll each ball in a bowl with granulated sugar and place on a cookie sheet greased with Pam. Make the cookies about apart. Press each cookie down with a fork to make the "peanut butter cookie" indentations. Bake for 10 to 12 minutes or until slightly browned on the edges. Let them cool on a cooling rack and then store in an airtight container. 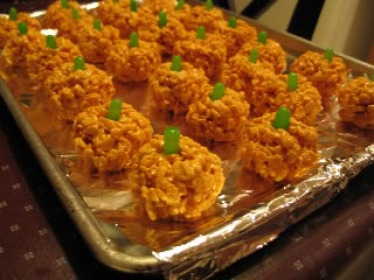 I made up this recipe once when I was attending a Halloween party and wanted something easy and festive to bring along. These are extremely easy to make, healthier than the original recipe, and everyone seems to love them. This is also a great meal to make with kids!
Ingredients:
Directions: First, cover two cookie sheets with the wax paper/oiled tin foil. Heat the vegetable oil in a large saucepan on medium-low heat. Then, add the entire bag of marshmallows. Start stirring with a wooden spoon and continue stirring constantly until all the marshmallows are almost completely melted. After that, add a generous amount of food coloring until the marshmallows are a deep orange color. Continue stirring until all the lumps are gone. Take the saucepan off of the heat and add 6-7 cups of Rice Krispie Cereal. Stir the cereal until it is completely incorporated. Scoop all of the Rice Krispie treat mixture onto one of the cookie sheets. Let the mixture cool for about a minute (or less) until its cool enough to handle with your hands. Now, working quickly, grab handfuls of the Rice Krispie mixture and roll it into a ball. The ball should be about the size of golf balls. Put each ball on the second cookie sheet. You need to work continuously until you finish, if you dont, the mixture will harden and no longer be moldable. After all the pumpkins are made, poke the top of each one with your finger and place a green Mike & Ike candy in the top. Voila! You have Pumpkin Rice Kirspie Treats! There should be about two dozen or more. 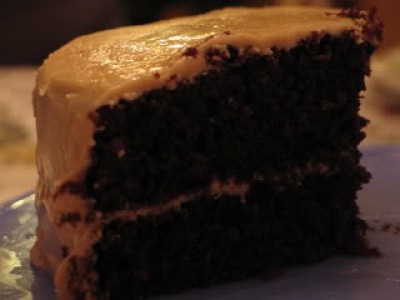 This is my birthday speciality! This is actually a recipe from Ina Garten called Beatty's Chocolate Cake that I altered in order to fit my diet. Everyone loves the diet version! Just writing this up makes me want to cook it again!
Cake Ingredients:
Frosting Ingredients:
Preheat oven to 350 degrees. Sift the flour, sugar, cocoa powder, baking soda, baking powder, and salt in a bowl. Combine the buttermilk, oil, eggs, and vanilla in the bowl of an electric mixer fitted with a paddle attachment and mix on low speed until combined. With the mixer on low speed, slowly add the dry ingredients to the wet. With the mixer still on low, add the coffee/espresso and stir just to combine, scraping the bottom of the bowl with a spatula. Pour the batter into the prepared pans and bake for 35 to 40 minutes, until a cake tester comes out clean. Take the cakes out of the pan immediately, turning them over onto a cooling rack. Let them cool there completely. Directions for the frosting: Beat peanut butter in a mixing bowl until its fluffy. Add 2 cups of the powdered sugar gradually, beating constantly. Add 1/4 cup of milk and the vanilla; slowly beat them in. Slowly beat in the rest of the powdered sugar and another 1/4 cup of milk. If necessary, add a little more milk if the frosting is not spreadable. Place one layer, flat side up, on a flat plate or cake pedestal. With a knife or offset spatula, spread the top with frosting. Place the second layer on the top, rounded side up, and spread the frosting evenly on the top and sides of the cake. *Tip: Frost the cake right away. This frosting will harden and not be smooth enough to spread after it dries. Also, wetting the knife will also help spreading if the frosting hardens. Enjoy this deliciously moist cake! |  AuthorMy name is Michelle Bolooki and I was diagnosed with Multiple Sclerosis in June 2002. I have been on the Swank MS Diet since April of 2005. I have created this blog in order to share some delicious and healthy low fat recipes that I have come across the last few years. Enjoy! CategoriesAll |
 RSS Feed