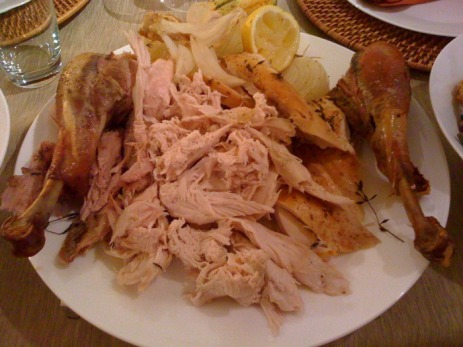
 *Once again, this picture does not do the meal justice! I didn't have time to take a picture of the turkey whole and this was right before we were digging in.* My mom makes the best turkey, hands down. Everyone that has tried it always agrees! The turkey is never dry and always falls off the bone because it's so moist and delicious. The best part is, it's incredibly easy to make and doesn't require you to wake up at the crack of dawn to get it done on time. I use this same exact recipe to roast chickens as well, so you can enjoy this recipe year-round if you like! Ingredients:
The night before you want to cook the turkey, take out the neck and giblets, and pour about half the bottle of the mojo marinade on the outside of the turkey and inside the cavity. Cover the turkey with tin foil and put it in a roasting pan in the refrigerator until you are ready to cook it the next day. The next day, begin by preheating the oven to 325 degrees. After that, brush the entire outside of the turkey with olive oil. Put salt and pepper all over the outside of the turkey and also inside the cavity. Then, put a pierced lemon inside the cavity, along with the head of garlic, about 3/4 of the bunch of thyme, and half of the yellow onion. Also, put onion in the neck, and if it fits, some more garlic. Finally, put a few sprigs of thyme under each arm of the turkey and some minced thyme and minced garlic sprinkled all over the outside of the turkey as well. Pour more mojo marinade over the turkey and inside the cavity, cover the turkey loosely with tinfoil and put it in the oven to bake. Use the table on the outside of the turkey bag in order to have an idea of how long the turkey will take to cook based on its weight. I personally do not use a thermometer or any other tool to check if the turkey is done. Instead, I just check it every hour (at which time I baste it with some drippings or more mojo). Once the legs are starting to fall out of the sockets and the juices are pretty much running clear, I uncover the turkey and cook it for about 20-30 more minutes so the outside can brown. Check to make sure the turkey is cooked through (it should be since the legs were already falling out of the sockets before), cut it up, and serve it. That's it! It's extremely easy and so delicious. I have never had a dry turkey or chicken with this recipe and its very flavorful. Enjoy!
13 Comments
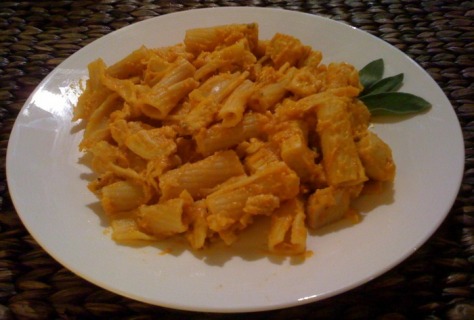 If you are anything like me, you probably read this title and thought that pumpkin and pasta together sounds a little gross an unappetizing. For me, it was because when I think of pumpkin, I think of something sweet and dessert-like. Sweet and dessert-like definitely doesn't go with something savory like pasta and chicken. I was so surprised that this recipe was a complete success! The sauce is incredibly flavorful and has that perfect mixture of Fall ingredients. I definitely recommend this dish!
Ingredients:
Season the chicken with salt and pepper, grill and set aside under some tinfoil to keep warm. Start cooking the pasta according to package directions and make sure to salt the pasta. While the pasta is cooking, sauté the shallots and garlic in the olive oil over medium heat for a couple of minutes, or until the shallots are translucent and soft. Then, add the chicken stock and pumpkin, stirring a couple of times until the pumpkin puree is smooth. After that, add the half and half and milk. Stir again until the ingredients have combined. Now season the mixture with hot sauce, nutmeg, cinnamon, salt, and pepper. Taste to make sure the flavors are to your liking. Reduce the heat to low and simmer for about 5-10 minutes, until the sauce thickens. Drain the pasta. Stir in the sage and the drained pasta, then stir in the grated parmesan topping and grilled chicken. Enjoy this lovely Fall dish and stay tuned for lots of Thanksgiving recipes to come this weekend!  Mmmmm biscuits! I looove biscuits. Before I was on the diet, KFC was my guilty pleasure and their biscuits and gravy were the best! I hadn't eaten biscuits in over five years and I thought it was about time I made up my own recipe to stifle the craving. After a couple of tries, I have finally perfected it! I personally can't have butter with my biscuits, so I just eat them with eggs and a veggie sausage patty (which is mouth watering good!). They are also amazing with some light maple syrup. :)
The best part of this recipe is that you can double it and freeze the extra biscuits to eat later on. That's what I have been doing lately and it's great to be able to have some warm and fresh biscuits every morning with breakfast! Another awesome part of this recipe is how easy it is. You may think that it sounds complicated, but you do not even need a mixer to make it (only a bowl, a big spoon, and your hands!) and the 20 minutes prep time spent is definitely worth it, especially if you double the recipe and freeze the rest to enjoy for a couple of weeks. Ingredients for Biscuits:
Preheat the oven to 450 degrees. In a large mixing bowl combine the flour, baking powder, baking soda, and salt. Stir well with a wooden spoon. In a separate bowl beat together the buttermilk, vegetable oil and egg. Pour the egg mixture over the flour mixture and stir to combine with a wooden spoon. Using your hands, make the dough into a large ball (make sure to grab all the loose pieces that didn't combine with the spoon). On a lightly floured surface, knead the dough gently for 12-14 strokes. Then, using a lightly floured rolling pin, roll the dough out so that it's about 3/4 of an inch thick. Cut the dough with a 31/2 inch cookie cutter or biscuit cutter (or whatever you have that is closest to that size). Roll up the leftover dough into a new ball and then using the pin, roll out the dough again in order to make more biscuits (you don't want to waste any dough!). Make the egg wash by whisking together the egg white and milk. Put the biscuits on an un-greased baking sheet, brush lightly with the egg wash and bake for 12-15 minutes or until the biscuits are golden brown. This recipe yields about 10-12 biscuits. *If you are freezing the extra biscuits, roll out the dough, cut them, and put them into airtight baggies. Do not bake them! When you are ready to eat them, take out the frozen biscuits, let them thaw for a minute or so, put them on the cookie sheet and bake as usual. Note: they make take longer to bake since they are frozen.* Tip - freeze the extra biscuits in individual portions. For example, I put two biscuits in each baggy since we only eat two every morning. n Enjoy this delicious and easy recipe and please leave a comment if you make them!  My new found love, Lifetime Cheese, makes the most delicious fat free cheeses I have ever tasted. Usually fat free cheeses taste rubbery and melt terribly. Lifetime Cheese actually tastes great and melts perfectly! I love the variety they offer as well (not just the typical mozzarella and cheddar). When I saw that they make a "Mild Mexican" flavor, I knew I had to finally make chicken quesadillas. Once I started sauteing the colorful vegetables I knew that this recipe would be amazing and healthy. Mmmm I wish I had leftovers to enjoy again tomorrow!
You can find this cheese at most grocery stores, but if you don't find it there you can also buy it from their website (link above)! Ingredients:
Preheat the oven to 350 degrees. Butterfly the chicken and put the thin breasts into a zip-loc bag with the vegetable oil, lime juice, garlic, and red pepper flakes. Massage the mixture around the chicken and let it marinade for at least an hour in the fridge. While the chicken is marinating, chop the red pepper, green pepper, onion, and mushrooms and set aside. Grate the cheese and set aside as well. *If making guacamole, you will also have time to prepare it during this time.* After the chicken has marinated, remove it from the fridge and cut the breasts into small cubes. Heat 1 tablespoon of olive oil in a medium large pan and add the chicken cubes. Sprinkle some fajita seasoning on your chicken, as much as you like Saute the chicken until they are cooked through. Remove the chicken from the pan and set aside. Add the remaining tablespoon of olive oil to the pan along with the peppers, onions, and mushrooms. Saute for a few minutes until the onion are soft and translucent. Add the cooked chicken back to the pan along with the spinach and saute for about one minute, until the spinach has wilted. Place two tortillas on a baking sheet. Scoop the chicken and vegetable mixture onto each tortilla and sprinkle some cheese over the top of each one. Then top with another tortilla. Bake the quesadillas in the oven for about 15-20 minutes, or until the cheese has melted and the tortillas are slightly toasted. Cut the tortillas into fourths and serve immediately with some plain yogurt, guacamole, and any other of your favorite dipping sauces!  Ina has some of the best recipes, one of them is this easy and delicious guacamole! The dip only takes about 10 minutes maximum to make from scratch and the outcome is perfect. I love how chunky it is! This is great to bring to a party with some baked chips or to use for dipping with some of your favorite Mexican dishes. Enjoy!
Ingredients:
Directions: First juice the lemon and set aside. Then chop the onion, tomato, and mince the garlic. After all those ingredients are prepared, cut the avocados in half, remove the pits, and scoop the flesh of the avocados into a bowl. Immediately after the avocados are in the bowl, add the lemon juice, hot sauce, onion, garlic, salt, and pepper and toss well with a large spoon. After that, slice the avocados into chunks using a sharp knife until you get your guacamole to the desired consistency (I like mine a little chunky). Add the tomatoes, toss some more, and then taste to see if the dip needs more salt, pepper, or hot sauce. Serve immediately or refrigerate and save for later. 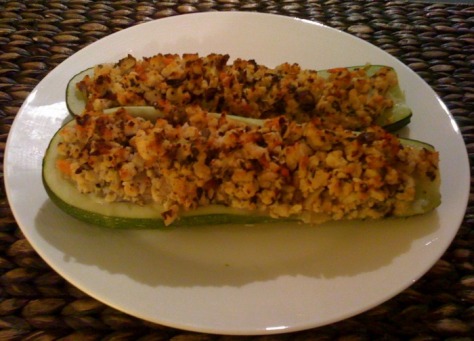 Andrew loves zucchini, so I was on the lookout for a good recipe that called for it. I came across this recipe on one of my favorite blog sites, http://annies-eats.com. The outcome was very yummy and the turkey almost tasted like sausage because of all the strong flavors. In fact, I think I am going to use this turkey mixture as a substitute for sausage in other recipes from now on! I also think this mixture would be amazing for stuffed mushrooms. Perhaps you will see a blog update in the near future with that experiment!
I made this recipe as a main dish, but after eating it I think it's better as an appetizer or side dish to another meal. Even though it has meat inside, we found ourselves wanting something else to go with it. I also think some plain yogurt would be a delicious addition to the top. Yum! Ingredients:
Preheat the oven to 375 degrees. Cut the zucchini in half lengthwise and scoop out the seeds and insides, leaving the shell about 1/4 inch thick. Save the soft part of insides of one of the zucchini and set aside. Prepare all your other ingredients. Chop the onion, mince the garlic, chop the mushrooms, herbs, etc. Heat 1 tablespoon of olive oil in a medium skillet over medium high heat. Saute the onions and garlic for a few minutes, until the onions are soft and translucent. After the onions are soft, add the mushrooms and zucchini insides. Saute for a couple of more minutes until the mushrooms are soft. Set aside In another medium sized skillet, heat 1 tablespoon of oil over medium high heat. Saute the ground turkey until its white and cooked through. Make sure to break up the turkey into tiny ground pieces. After the turkey has cooked, add the onion and mushroom mixture and stir well. Then add the wine, tomatoes, and herbs to the skillet as well. Stir and cook the mixture for another minute or two. Remove the pan from the heat and let the mixture cool for a few minutes. Once the mixture has cooled a little bit, add the egg, parmesan topping, salt, pepper and stir well. Scoop the turkey mixture into the zucchini halves. Pour water into the baking sheet so its about 1/4 inch high. Put the stuffed zucchini on the baking sheet and put in the oven for 40 minutes, or until the stuffing is golden brown. Serve immediately and enjoy this very healthy dish! 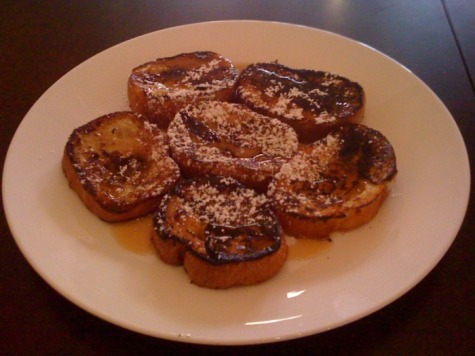 This has been a weekend staple at my house for as long as I can remember. The best part about it, is how incredibly easy it is to make. You can use thick french bread, like I did, or you can use regular sandwich bread. We usually had it with regular sandwich bread in my house, because that's almost always at hand. I had some leftover French bread from dinner this weekend and since it was a little stale, this was the perfect thing to make with it!
Thanks for teaching me how to make this yummy easy recipe, Mom! Ingredients:
Put the milk in a small mixing bowl with the egg and vanilla extract. Beat the egg until its well incorporated into the milk. Sprinkle cinnamon on top so that there is a generous amount covering the top of the milk. Heat a medium or large frying pan with the vegetable oil on medium high heat. Dip each piece of bread on both sides in the milk mixture so its moist but not completely soaked. Put the soaked bread pieces on the frying pan and let simmer and toast on each side (be sure to watch them so they don't burn). If you use French bread, you should be able to put a few pieces at a time, if you use regular bread, only one piece will probably fit on the pan at a time. Serve the toast immediately and top with some maple syrup, powdered sugar, and even fruit if you have it. Yum! 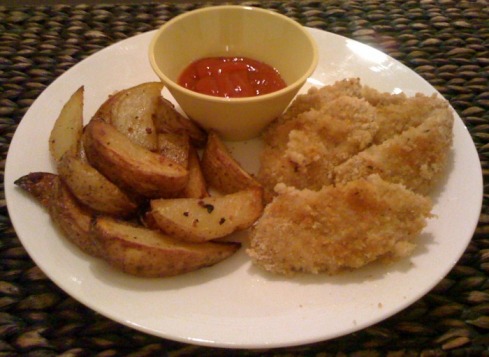 Oh yes, I said parmesan! This is not the parmesan you are expecting, but it's just as delicious! I decided to try some vegan/soy parmesan topping and I was not disappointed! What makes grated parmesan taste good? Parmesan flavor? Check! Parmesan consistency? Check! Fat content? Not so much. I am so happy to have found this and will be using it in a lot of my recipes from now on. Next on the diet hunt, blocks of fat free parmesan cheese. :)
This recipe is basically the same as my previous blog entry of Baked Italian Chicken Tenders, just with the parmesan added and different fries. This is a quick and easy meal for a weeknight. Yum! Ingredients for Chicken Tenders:
Directions for Chicken Tenders: Preheat the oven to 400 degrees. First, cut the chicken breasts up into chicken tenders. Then, put the chicken tender pieces in a large bowl and pour the buttermilk over them. Toss the chicken tenders in the buttermilk and make sure they are completely coated. Cover the bowl and put them in the refrigerator for at least 30 minutes. Combine the bread crumbs and parmesan topping in a bowl with a fork or whisk. Once the chicken is done marinating, take the chicken pieces directly from the buttermilk and coat each tender it in the breading. Make sure to pat the breading so that it sticks to the chicken pieces all over. Put the chicken tenders on a baking sheet and drizzle with a little olive oil. Bake the chicken tenders for 12-15 minutes, turning once, or until browned and cooked through. Serve immediately with your favorite dipping sauce. Directions for Potato Wedges: While the chicken is marinating, cut the potatoes into wedges. First, cut the potatoes lengthwise and then cut each half in thirds lengthwise. You'll have 6 wedges if you use a large potato. Put the potatoes on a cookie sheet and cover the potatoes with the olive oil, salt and pepper. With washed hands, toss the potatoes inside the oil, salt and pepper to make sure each potato is well coated. Spread the potatoes on the sheet in a single layer so one side of each potato is down. Bake the potatoes for 30 to 35 minutes, turning the potatoes once after about 20 minutes. Bake until the potatoes are browned and crispy on the outside, but not burned. Sprinkle with a little more salt and serve immediately. Yum! Tip: Put the potatoes in the oven first, on the bottom rack, so that the fries and chicken tenders are done at the same time.  Happy Halloween, everyone! Halloween is one of my favorite holidays and I loved that I was able to make something fun and festive for dinner! The original recipe for mummy dogs calls for Pillsbury Crescent rolls, which are extremely fattening and unhealthy. I tried out a new biscuit recipe instead and they came out great! For the boo-tatoes I used 365 organic instant potatoes. They are delicious and make extremely creamy potatoes which were great for the ghosts. I know I should of posted this recipe before Halloween, but unfortunately I was too busy. Make them next year if you can!
Ingredients for Mummy Dogs:
Preheat the oven to 450 degrees. Mix together the flour, baking powder, baking soda, and salt. In a separate bowl, whisk together the buttermilk and oil. Add the milk mixture to the flour mixture. Mix it with a wooden spoon or with your hands. This works better than the standing mixer. Add a little more milk if the dough is too dry to stick together. On a lightly floured surface, knead the dough gently 10 to 12 times. Then, using a floured rolling pin, roll the dough out to about a 1/2 inch thick. Cut the dough into thin strips. Wrap each turkey dog with the strips of the dough. Don't worry if pieces of the dough break off, mummies aren't wrapped perfectly! Make sure to leave a little piece opened at the top for the eyes! Bake the mummy dogs on a non-greased cookie sheet for 12-15 minutes, or until the dough is golden brown. Use ketchup to make two eyes on the mummies and serve with some blood (ketchup). Enjoy! Ingredients for Mashed Boo-Tatoes:
Put the mashed potatoes inside the piping bag and pipe them out into the shape of ghosts. Put two black sesame seeds on each for eyes. Serve with the mummy dogs and enjoy!  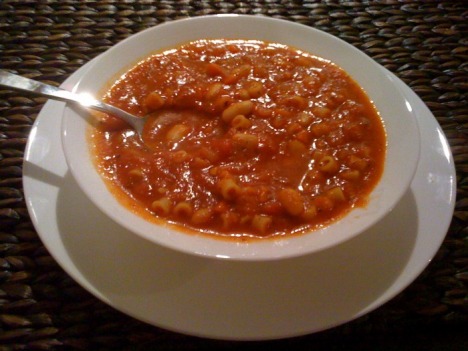 You know when it's freezing outside and all you crave is some delicious soup to warm you to the core? Well, I actually don't know what that's like. You know why? I live in South Florida! However, this soup was absolutely perfect and definitely hit the spot, even on a warm 87 degree Florida day. :)
We paired the soup with some Italian bread toasted with garlic, oil, and mozzarella, and then topped with basil and tomato. This little sandwich was to die for! Even with fat free mozzarella cheese! I found a new brand of fat free cheese that is now my favorite. My husband actually thinks this soup tastes like the old Olive Garden minestrone soup. He loved it! We froze half of it to have it again in a couple of weeks and I can't wait to enjoy it for the second time! :) Ingredients for Tomato Soup:
Preheat the oven to 400 degrees. Warm the olive oil in a large soup pot over medium-high heat. Add the carrots, onion, and garlic and saute until soft, about 5-10 minutes. Add the jars of tomato sauce, chicken broth, cannellini beans, red pepper flakes, pasta, and pepper. Simmer for about 15-20 minutes. While the soup is simmering, put the minced garlic in a small bowl with the olive oil. Cut the loaf in half and then in half again, like a sandwich. Then, using a brush, brush the garlic and oil all over the inside of the bread. Add about three pieces of mozzarella to each piece of sandwich, along with a little more oil, and three or four leaves of basil. Wrap the sandwiches in foil and bake for 10-15 minutes, or until the cheese is soft and melted. Remember, it's fat free cheese so it won't melt the same as regular fat cheese, but it will be soft. After the sandwiches are done, add some tomato slices to each sandwich and serve along side with the soup. This makes about 8 servings of soup, so save some room in your freezer to have some more soup later! |  AuthorMy name is Michelle Bolooki and I was diagnosed with Multiple Sclerosis in June 2002. I have been on the Swank MS Diet since April of 2005. I have created this blog in order to share some delicious and healthy low fat recipes that I have come across the last few years. Enjoy! CategoriesAll |
 RSS Feed