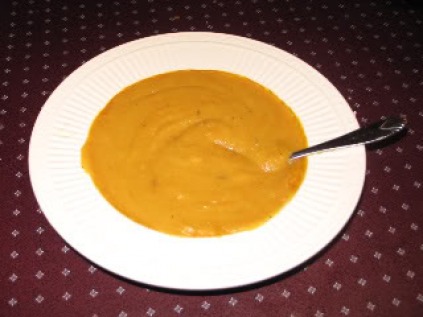
 I love cooking things that can be turned into other meals! After you make some roasted fall vegetables, you can take a few cups of the vegetables and turn it into a delicious soup for another meal. I served this at Thanksgiving one year as an appetizer and it got rave reviews. I also love eating this soup for lunch with some pieces of a toasted baguette.
Ingredients:
Working in batches, puree vegetables with a blender. I put 3 cups of vegetables in the blender with 1 cup of water. Pour each batch of the puree with a fine mesh sieve into a large saucepan, pressing the puree through with a spoon or spatula. Discard any chunks that wont fit through the sieve. After you have finished pureeing all of the vegetables, heat the soup on medium heat. You may need to thin the soup with a little bit more water if necessary. Then add the lemon juice, milk, salt, pepper, and sugar. The salt and pepper is to taste, so don't be afraid to ad a lot of it if necessary! Serve the soup with some toasted bread or crackers. Enjoy!
1 Comment
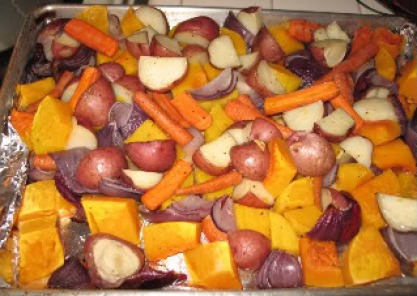 This is one of my favorite Fall recipes and I cannot wait to make it every year. This is actually a Martha Stewart recipe that I adapted (made better!)
Ingredients for Roasted Fall Vegetables:
Preheat oven to 450 degrees. Place the vegetables and garlic on baking sheet lined with tinfoil. You may need to baking sheets. Drizzle the vegetables with oil and sprinkle with kosher salt and ground black pepper. Roast the vegetables in the oven until tender and beginning to brown, about 45 minutes. Toss the vegetables and rotate the sheets halfway through cooking. You can serve these vegetables on the side of anything, but my favorite is with some delicious oven roasted chicken or turkey. Mmm mmm good!  I made up this recipe once when I was attending a Halloween party and wanted something easy and festive to bring along. These are extremely easy to make, healthier than the original recipe, and everyone seems to love them. This is also a great meal to make with kids!
Ingredients:
Directions: First, cover two cookie sheets with the wax paper/oiled tin foil. Heat the vegetable oil in a large saucepan on medium-low heat. Then, add the entire bag of marshmallows. Start stirring with a wooden spoon and continue stirring constantly until all the marshmallows are almost completely melted. After that, add a generous amount of food coloring until the marshmallows are a deep orange color. Continue stirring until all the lumps are gone. Take the saucepan off of the heat and add 6-7 cups of Rice Krispie Cereal. Stir the cereal until it is completely incorporated. Scoop all of the Rice Krispie treat mixture onto one of the cookie sheets. Let the mixture cool for about a minute (or less) until its cool enough to handle with your hands. Now, working quickly, grab handfuls of the Rice Krispie mixture and roll it into a ball. The ball should be about the size of golf balls. Put each ball on the second cookie sheet. You need to work continuously until you finish, if you dont, the mixture will harden and no longer be moldable. After all the pumpkins are made, poke the top of each one with your finger and place a green Mike & Ike candy in the top. Voila! You have Pumpkin Rice Kirspie Treats! There should be about two dozen or more. 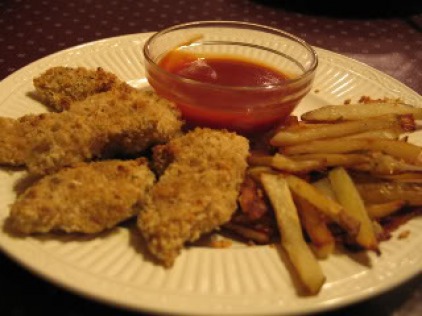 These chicken tenders are easy and delicious! The fries are guilt free and of course, extremely tasty. I actually got the chicken recipe from Giada De Laurentis and altered it to make it healthier. The fry recipe is from Ellie Krieger who has an awesome show on the Food Network called "Healthy Appetite with Ellie Krieger". She has tons of awesome and healthy recipes on there!
Chicken Tender Ingredients:
While the chicken is marinating, cut the potatoes into French Fries. To do this, cut the ends off of the potato, then cut the potato in half lengthwise, then cut the halves in half lengthwise. After that, cut each piece into strips that are the same size. Then, cut each strip into individual fries. Try to cut each fry the same size to that they cook evenly. *Tip: If you make fries frequently, it may be worth it to buy a fry cutter. You can get some good ones for very inexpensive (less than $20) at places like Bed Bath and Beyond! Once the fries are cut, heat 5 tablespoons of olive oil in a pan on medium high heat. Add the minced garlic and stir constantly to avoid the garlic from burning. Once the garlic is browned and crispy (after about 2 minutes), take the pan off of the heat. Then, strain the garlic through a strainer so that you separate the garlic pieces from the oil. Add 1 tablespoon of kosher salt to the garlic oil, stir a little to combine, and then coat the fries with the garlic oil. Coat a baking sheet with olive oil and spread the fried over the pan evenly so that each fry is touching the sheet. Bake the fries in the oven for 30-35 minutes or until they are brown and crisp. Make sure to turn the fries over at least once while baking. Sprinkle the garlic pieces and parsley over the fries. While the fries begin baking, mix the Panko Italian bread crumbs with the regular Italian bread crumbs. Then, take each buttermilk coated chicken tender and dip it into the bread crumbs. Gently pat the bread crumbs so they stick well to the chicken tenders. Put all the pieces of breaded chicken tenders on a baking sheet coated with olive oil. Drizzle some more olive oil on top of the chicken tenders and put them in the oven. Bake the chicken tenders for about 12-15 minutes, or until browned and cooked through. Tip: Put the fries on the bottom rack of the oven and the chicken tenders on the second rack. The French fries need more time to cook and this will help speed up the process. Serve the chicken tenders with ketchup or your favorite dipping sauce. Yum!  Andrew and I loooove bruschetta. We sometimes have to skip out on it in restaurants because they have cheese (and they can't remove it) but this version is just as tasty and there is no dairy.
Ingredients:
First, cut the tomatoes into quarters. Then, clean out all of the seeds from the tomatoes using a spoon. There should be no seeds or juice left inside the tomatoes. After that, press each piece of tomato down and cut it into strips, then cubes. All of the tomato pieces should be about the same size. For the basil, a chiffonade works best. To do this, stack fresh basil leaves one on top of the other until you get several leaves. Then roll up the leaves. Slice very thin slices off of the little roll of leaves. You will get a very thin shredded look to the basil without bruising the leaves. Mince the thyme and oregano as well as the garlic. Combine the tomatoes, chopped garlic, herbs, salt, pepper, olive oil, and balsamic vinegar in a glass or plastic bowl. Mix well and refrigerate for at least 30 minutes. The longer you keep the mixture in the refrigerator, the better it will taste! While the bruschetta mixture is cooling, preheat the oven to 400 degrees. Slice the baguettes on a diagonal in thin slices. Drizzle the slices with olive oil and bake the bread in the oven for about 10 minutes or until toasted. After the bruschetta has cooled and the bread is toasted, top a little bit of the bruschetta mixture on each slice of bread. Bon Appetit! 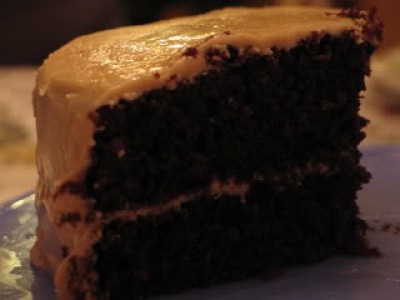 This is my birthday speciality! This is actually a recipe from Ina Garten called Beatty's Chocolate Cake that I altered in order to fit my diet. Everyone loves the diet version! Just writing this up makes me want to cook it again!
Cake Ingredients:
Frosting Ingredients:
Preheat oven to 350 degrees. Sift the flour, sugar, cocoa powder, baking soda, baking powder, and salt in a bowl. Combine the buttermilk, oil, eggs, and vanilla in the bowl of an electric mixer fitted with a paddle attachment and mix on low speed until combined. With the mixer on low speed, slowly add the dry ingredients to the wet. With the mixer still on low, add the coffee/espresso and stir just to combine, scraping the bottom of the bowl with a spatula. Pour the batter into the prepared pans and bake for 35 to 40 minutes, until a cake tester comes out clean. Take the cakes out of the pan immediately, turning them over onto a cooling rack. Let them cool there completely. Directions for the frosting: Beat peanut butter in a mixing bowl until its fluffy. Add 2 cups of the powdered sugar gradually, beating constantly. Add 1/4 cup of milk and the vanilla; slowly beat them in. Slowly beat in the rest of the powdered sugar and another 1/4 cup of milk. If necessary, add a little more milk if the frosting is not spreadable. Place one layer, flat side up, on a flat plate or cake pedestal. With a knife or offset spatula, spread the top with frosting. Place the second layer on the top, rounded side up, and spread the frosting evenly on the top and sides of the cake. *Tip: Frost the cake right away. This frosting will harden and not be smooth enough to spread after it dries. Also, wetting the knife will also help spreading if the frosting hardens. Enjoy this deliciously moist cake! 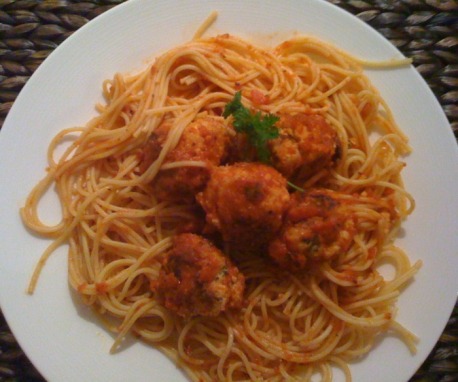 Spaghetti and turkey meatballs is another favorite meal. The best part is that you can put the meatballs in some bread the next day and have turkey meatball subs - so delish!
For this recipe, I suggest you use the brands that I specifically recommend in order to have the best tasting results. Sometimes when you cook low fat meals, you need the absolute best ingredients to make up for it. Also, make sure the ground turkey you buy is Extra Lean, or 99% fat free. Turkey that isn't lean is pretty much the same as eating full fat ground beef! Ingredients:
To make meatballs, mix the first 7 ingredients in a large bowl to blend. Stir in the bread crumbs. Fold in the ground turkey using a fork, not your hands (they will be too dense). Shape the meatballs with your hands, they should be about the size of gold balls. Heat the olive oil in a heavy large frying pan over medium-high heat. Working in 2-3 batches, add the meatballs and saute until browned on all sides, about 5 minutes. Using a slotted spoon, transfer the meatballs to a plate. Pour off any excess oil and turkey remnants. Return all the meatballs to the pan. Add the marinara sauce. Simmer over medium-low heat until the sauce thickens slightly and the flavors blend, about 10 minutes. Begin cooking the spaghetti in salted boiling water. One the 10 minutes pass, chick one of the meatballs to make sure its cooked all the way through. Add the sauce and meatballs to the spaghetti. Enjoy this delicious meal!  This is one of my husband and I's absolute favorite recipes! Thus, it's the first recipe on my blog! I actually found it on the Swank MS Diet Message Board, posted by the user named KerrBear. I adapted it a bit though and love the results!
I find it pretty simple to make, and it's great as a main course or as an appetizer for a party. I once brought it to a Super Bowl party and it was a huge hit! Of course, as everything on this blog, it is very low fat, so don't feel guilty about enjoying these delicious "chicken wings"! "Wing" Ingredients:
Preheat the oven to 425 degrees. Cut the chicken breast into bite size strips. Crush the whole sleeve of Fat Free Saltines using a food processor or plastic bag and mallet. Make sure that they aren't too finely crushed, since you want them to have the consistency of chicken wings. After the Saltines are crushed, make an assembly line of chicken, Hooters Wing Breading/flour, egg whites mixed with a little bit of water, and the crushed Saltines. First, coat the chicken in the flour, then dip it in the egg mixture, and then in the Saltine crumbles. Make sure that the chicken is coated completely in the crumbles. Place each piece of chicken on the greased baking sheet. *Tip: Use only one hand for the coating process, this will actually help you go faster and keep one hand clean. Cook the chicken pieces for 20 minutes in the oven, turning them over once to cook evenly. Cut the fattest piece of chicken to make sure that they have all cooked through, then put all of the pieces of chicken in a large mixing bowl. Pour the entire bottle of Footy's Wing Sauce in the bowl and toss the chicken in the sauce until each piece is coated thoroughly. While the chicken is baking, put 4 TBLSP of Low Fat/Fat Free Ranch dressing and 4 TBLSP of Feta Cheese Crumbles in a container. Mix well and put the sauce in the refrigerator to cool. Clean and cut the celery up into bite size pieces. Display the chicken on a platter with the celery and sauce. Enjoy! :) |  AuthorMy name is Michelle Bolooki and I was diagnosed with Multiple Sclerosis in June 2002. I have been on the Swank MS Diet since April of 2005. I have created this blog in order to share some delicious and healthy low fat recipes that I have come across the last few years. Enjoy! CategoriesAll |
 RSS Feed